Here are two great towels I rescued from the paint cleanup pile at my parents' house today. I don't have any ideas yet for how to use them, but I know I want to! I'm open to suggestions, so please help!
Pages
▼
Wednesday, September 29, 2010
Tuesday, September 28, 2010
Sew a Luggage Tag!
I have a lot of family members who fly all the time, especially my brother. I love making gifts but have trouble thinking of ideas for men. So I thought I could make him a luggage tag. Please bear in mind, I want to finish it with some clear vinyl sewn as a pocket where he could slip a business card to identify his bag. (I just didn't have any...and the nearest craft store is about 30 minutes away from where we're living right now...so I'll start a list!!)
I used corduroy fabric, so I didn't use any interfacing. I really don't like interfacing. I never seem to have it when I need it. I don't ever know what weight to buy. So I thought corduroy would have enough body (especially after I add the vinyl). I cut two pieces 3 1/2" x 5" and one piece 2" x 12".I sewed the 2"x12" piece into a tube and turned it. Then I sewed the rectangular pieces together (right sides together) and left a hole for turning.
I pressed the pieces, then sewed the tube into the hole left by turning on the rectangle. I top stitched around the whole thing to secure the tube.
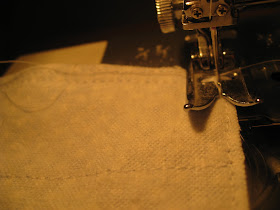
If you use corduroy or another type of fabric that stretches, be careful not to sew the long edges against the grain. Otherwise, it will look like this:
I pressed the pieces, then sewed the tube into the hole left by turning on the rectangle. I top stitched around the whole thing to secure the tube.
If you use corduroy or another type of fabric that stretches, be careful not to sew the long edges against the grain. Otherwise, it will look like this:
Monday, September 27, 2010
Spaghetti Squash
We like to eat healthy foods that are in season. Fall is a great time of year for Spaghetti Squash. For a few years, I've been making this recipe. FYI, Spaghetti squashes are really hard to cut in half if they are raw. So start by pricking the squash a few times with a fork and then putting it in the microwave for about 8 minutes.
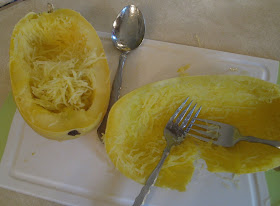
Then let it sit for another 5 minutes. Cut it in half, scoop out the seeds (they're sort of like pumpkin seeds) and then start shredding it with two forks, as shown below. Don't be afraid to shred it to the skin.
Then put the spaghetti-like strands into a baking dish. I add salt, pepper, Parmesan cheese, mozzarella cheese, and spaghetti sauce. Then I bake it at 350 degrees for about 30 minutes, or until the sauce is bubbly. Yum.
I never thought I'd like squash!
Then let it sit for another 5 minutes. Cut it in half, scoop out the seeds (they're sort of like pumpkin seeds) and then start shredding it with two forks, as shown below. Don't be afraid to shred it to the skin.
Then put the spaghetti-like strands into a baking dish. I add salt, pepper, Parmesan cheese, mozzarella cheese, and spaghetti sauce. Then I bake it at 350 degrees for about 30 minutes, or until the sauce is bubbly. Yum.
I never thought I'd like squash!
Sunday, September 26, 2010
Life Goal: Learn to Reupholster.
I really want to be able to reupholster furniture.
First I have to find some furniture I don't mind possibly ruining. Then I have to find some cheapo fabric I don't mind ruining, too!
here is some info
this woman just attacked the chair.
I wouldn't choose this fabric...but still, looks good to me.
more info. my parents have two chairs just like these that were my grandmother's. the fabric is horrid. i could start with them!! just give me a few weeks.
Saturday, September 25, 2010
Removing Crayon from Vinyl Floors
My little boy has discovered the wonders of crayons. He even wrote all over the vinyl kitchen floor at my parents' house with his favorites.
Luckily, I was able to get it off using silver polish.
Crayola has a whole portion of their website devoted to removal of their products. In case you're wondering, they claim WD-40 removes crayon from brick, concrete, carpet, chalkboards, cloth car interiors, painted walls, plastic, and tile.
Luckily, I was able to get it off using silver polish.
Crayola has a whole portion of their website devoted to removal of their products. In case you're wondering, they claim WD-40 removes crayon from brick, concrete, carpet, chalkboards, cloth car interiors, painted walls, plastic, and tile.
(Does Crayola own the company that makes WD-40??)
Thursday, September 23, 2010
Bathroom Cleaning Tip
I haven't posted cleaning tips for awhile. Here's a good one: Use rubbing alcohol on bathroom fixtures to help them shine.
If you're trying to sell your house, this can help your bathroom look inviting!
Wednesday, September 22, 2010
Gift Idea for Boys
I have three extremely cute male cousins who are between the ages of 7-12. Flannel pillow cases were their gift two Christmases ago. (I'm going through the archives of my pictures...don't judge...I'm just working on a VERY BIG home improvement project at the moment!)
These were really easy to make. Here's a tutorial suggestion.
I love flannel. It is so nice and soft.
These were really easy to make. Here's a tutorial suggestion.
I love flannel. It is so nice and soft.
Tuesday, September 21, 2010
Toddler Pickiness
My little guy doesn't really like meat. He eats hamburgers selectively (if they're nice and salty, I like to mix garlic salt and BBQ sauce into ours) and doesn't like chicken very often. He does love hot dogs.
But I feel guilty feeding him a hot dog every day. Too much salt.
He loves my mom's meatloaf (it was my grandmother's recipe). I can't make it myself b/c I don't think it is all that healthy (sorry mom!) and I don't have a place to buy the mix around here (she gets it at a small, family-owned grocery store).
My solution: make him meatballs. I made 1.5 dozen this morning and plan to freeze them. To my delight, I found some grass-fed beef at a farmer's market this weekend and used 1 pound of the ground beef in the meatballs.
I added 1 cup of Panko breadcrumbs (the Japanese kind which are flaked instead of ground so it is lighter and has more volume than regular crumbs).
Then I added a small amount of salt, pepper, an egg, minced fresh basil (I didn't measure) plus I chopped 1/2 an onion and shredded a carrot.
I'm hoping he eats these meatballs to get some more iron and protein into his diet.
Monday, September 20, 2010
Making a Flower Arrangement
We're currently in the process of selling our home. We have had two open houses and three showings. In about seven weeks. That's it. So I tried to do everything I could think of to make it more appealing to potential buyers. While we cleared clutter and put away pictures, I didn't want to make our home seem impersonal or uninviting.
So we bought a fake plant. Also, I wanted a flower arrangement or something for the living room's coffee table. I'm not one usually into flower arrangements...but I decided to make an exception. I didn't want to spend much money. So for $11.75, I made this:
I went to Pat Catan's, a wonderful craft store, and found these things: a tin rectangular bucket, $1 fake flowers (I bought 5 bunches) and a foam brick to hold it all together.
Then my wire cutters got jammed. I guess they're not so great.
Luckily, this was the set of tools my husband allotted me for crafting use, so he won't be upset they are now kaput.
Then I poked the remaining stem into the foam brick. This should be done with the brick inside the container so one knows how far the blooms should protrude. Live and learn.
I tried to make things symmetrical.
I think it looks good. It isn't too "floral-y" for me!
Friday, September 17, 2010
Bran Raisin Muffins
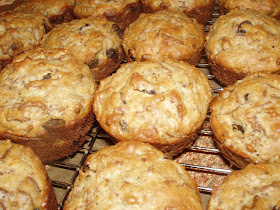
These muffins are GREAT. We used to make them all the time. Then once we started reading ingredient labels, we found out that there was high fructose corn syrup in the bran cereal we used (the recipe came from the cereal's box, we made a few modifications).
But then I found bran cereal at Trader Joe's last month with NO HFCS!! Yippie!
My husband is running a marathon next weekend, so he needs to carbo load. He requested that I make these muffins to help him with the carbo loading (also defined as 'eating as much as possible' by one of my Exercise Physiology professors in grad school...real technical, right?)
2. Stir together flour, sugar, baking powder and salt. Set aside.
3. In large mixing bowl, combine the bran cereal and milk. Let stand about 2 minutes or until cereal softens. Add egg and oil. Beat well. Add flour mixture, stirring only until combined. Drain the raisins, fold them into the batter. Portion evenly into twelve 2 1/2-inch muffin pan cups coated with cooking spray.
3. Bake at 400° F about 20 minutes or until golden brown. Serve warm.
But then I found bran cereal at Trader Joe's last month with NO HFCS!! Yippie!
My husband is running a marathon next weekend, so he needs to carbo load. He requested that I make these muffins to help him with the carbo loading (also defined as 'eating as much as possible' by one of my Exercise Physiology professors in grad school...real technical, right?)
Ingredients
- 1 1/4 cups all-purpose flour
- 1/4 cup sugar
- 1 tablespoon baking powder
- 1/4 teaspoon salt
- 2 cups bran cereal (like Kellog's All-Bran)
- 1 1/4 cups fat-free milk
- 1 egg
- 1/4 cup vegetable oil (I always use a little less)
- 1/2 cup raisins
Directions
1. Place raisins in a bowl. Cover with boiling water.2. Stir together flour, sugar, baking powder and salt. Set aside.
3. In large mixing bowl, combine the bran cereal and milk. Let stand about 2 minutes or until cereal softens. Add egg and oil. Beat well. Add flour mixture, stirring only until combined. Drain the raisins, fold them into the batter. Portion evenly into twelve 2 1/2-inch muffin pan cups coated with cooking spray.
3. Bake at 400° F about 20 minutes or until golden brown. Serve warm.
Wednesday, September 15, 2010
Round Edge Baby Blanket
Here is another baby blanket I made using a round edge instead of a square corner.
I had found this cute apple fabric on clearance and had to get it b/c it is pink and red. I then found the pink fuzzy backing on sale, too. This probably cost me about $5 to make!
Here's what I did: When I was cutting the fabrics, I just used a saucer (from my kitchen) to round the edges. I sewed the two fabrics together (right sides together) like normal, leaving a hole for turning. Then I topstitched the edge with a zig-zag stitch.
Tuesday, September 14, 2010
What Not to Buy @ Target
If you've been reading my blog, you know I like Target. A lot.
So this caught my eye on Yahoo. Just to help me remember what NOT to buy at Target, I'm posting it. Also, it will help those readers who may also adore Target.
Monday, September 13, 2010
Organizing and Tossing
Since we're moving, I've been cleaning out drawers. By my computer, I have accumulated a modest stack of gift cards. I didn't know if they had any money left on them but wanted to either toss them or put them in my wallet--depending on their status, of course.
I started trying to search each store's individual site to find where to enter the codes...but that was taking too long. So I googled "check balance of lands end gift card" and this website came up that links to lots of different store's pages where one can do this.
I'm not being paid or anything, but thought I'd share this tip with my readers.
giftcardbalancecheck.com
I wish I had thought of that idea for a site!!
Friday, September 10, 2010
CD Sleeve: Alternative!
Did you like the CD Sleeve tutorial? I came up with an alternate way to finish it.
No binding required! Start with the front pockets fully stitched...
Place the backing and pockets right sides together.
Add a ribbon in the top center to act as a hanger, if desired.
Stitch around the whole thing, but leave a hole for turning at the bottom.
Turn, press, and then topstitch everything. Make sure you close the opening you left to turn it.
Thursday, September 9, 2010
Another China Hutch Idea...
Remember how I garbage-picked my china hutch? And then I refinished it? Here's another idea for the same type of furniture. My dad (who loves wood's natural grain) would hate this idea...but it looks pretty neato:
Game Room Hutch
Game Room Hutch
Wednesday, September 8, 2010
CD Sleeve Tutorial
I wanted to make one of these for my son's CDs. I planto hang it in the kitchen cupboard or in his bedroom if he has a CD player in there when we get a new house.
This is what I cut: nine 8x5" scraps of flannel (for the pockets) and two 14x8" pieces (for the back and the backing for the front). I also had some pieces for the middle that contained interfacing.
I pressed the tops of each piece and then hemmed them. Then I attached all the pieces to one of the 8x14" pieces. Make sure to sew all the way around each pocket individually or the CDs will slide through to the bottom. Position each pocket about 1" from the top of the one above.
Now trim the edges as close to the stitching as possible.
Next, you will attach the front to the back piece. I added interfacing (it was attached to a scrap of green gingham) into the middle. If you want to attach velcro or ribbon pieces to the outer seam, now is the time to do that, too. Attach by sewing all the way around the perimeter.Clip your seams again as close to the last perimeter seam as possible.
Tuesday, September 7, 2010
Jewelry Making: Bracelet
I really love beads. I haven't been making much jewelry lately because I'm afraid my 15-month old will eat the beads. But I needed to re-string these beads and did so during his nap yesterday. I love this bracelet now! Should I bother posting a tutorial for jewelry-making? Or is that something that is too self-explanatory?
Monday, September 6, 2010
Sunday, September 5, 2010
De-Cluttering to Move
We're in the middle of moving. As I write this post, I have a zillion things to do. Like de-clutter the entire house, refold linens to make the closets look nice, and shop-vac the bugs out of the basement. All of these things will make the house look more appealing to buyers. I think I liked this house in the first place because it was neat, tidy, and clean. And because it had a big kitchen. See?
I love our kitchen. I should've written a tutorial on doing your own wood floor. My husband and I did ours. I was 10 weeks pregnant at the time! But I digress.
When we first listed the house to sell four weeks ago, I went through and put away all of our pictures, my husband's bobble head collection, and other random things that just are always 'there'. Safety pins, snow globe that doubles as body spray, a ribbon from a stuffed animal that our son took off, you get the picture!
But the lesson is that I like the way my house looks without all the stuff around. It is nice to not have piles of mail sitting on the kitchen counter. Or by the computer. I'm wondering if I'll even unpack the other things when we finally get settled into our own place. To enjoy our new space more, I'm maybe going to leave it "de-cluttered". I might have to convince my husband to go along with this. Even though his bobble heads were free (at sporting events), I'm not sure I'll be able to give them away without some convincing.
Focaccia Bread
I like to make bread. I have made this focaccia bread several times. I use this recipe from AllRecipes.com:
Ingredients Directions
Ingredients
- 2 3/4 cups all-purpose flour
- 1 teaspoon salt
- 1 teaspoon white sugar
- 1 tablespoon active dry yeast
- 1 teaspoon garlic salt
- 1 teaspoon dried oregano
- 1 teaspoon dried thyme
- 1/2 teaspoon dried basil
- 1 pinch ground black pepper
- 1 tablespoon vegetable oil
- 1 cup water
- 2 tablespoons olive oil
- 1 tablespoon grated Parmesan cheese
- 1 cup mozzarella
- In a large bowl, stir together the flour, salt, sugar, yeast, garlic powder, oregano, thyme, basil and black pepper. Mix in the vegetable oil and water.
- When the dough has pulled together, turn it out onto a lightly floured surface, and knead until smooth and elastic. Lightly oil a large bowl, place the dough in the bowl, and turn to coat with oil. Cover with a damp cloth, and let rise in a warm place for 20 minutes.
- Preheat oven to 450 degrees F (230 degrees C). Punch dough down; place on greased baking sheet. Pat into a 1/2 inch thick rectangle. Brush top with olive oil. Sprinkle with Parmesan cheese and mozzarella cheese.
- Bake in preheated oven for 15 minutes, or until golden brown. Serve warm.
When I say we all like it, I mean everyone:
Saturday, September 4, 2010
Tabbouleh & Chicken
Lots of my readers may have a garden overflowing with parsley. Or maybe you have a friend with abundant parsley. That's how I acquired a large bunch of parsley. What do you do with it all? Make tabbouleh. While it is something I never thought I'd like, it is very healthy and a great way to get some veggies into your diet! The hardest part is chopping everything up to add to the salad.
Ingredients:
- 1/2 cup uncooked bulgur
- 1/2 cup boiling water
- 10 cherry tomatoes, halved
- 1 cooked chicken breast, shredded or cubed
- 3/4 cup minced fresh flat-leaf parsley
- 1/2 of a red bell pepper, chopped
- 1/2 of an English cucumber, diced
- 1/4 cup minced fresh basil
- 3 tablespoons fresh lemon juice
- 2 tablespoon extra-virgin olive oil
- 1/2 teaspoon salt
- 1/4 teaspoon freshly ground black pepper
Preparation
1. Combine bulgur and 1/2 cup boiling water in a large bowl. Cover and let stand 15 minutes or until the bulgur is tender. Drain well; return bulgur to bowl. Cool.
2. Mix together the lemon juice, olive oil, and salt and pepper to make the dressing.
3. Throw all the other ingredients into the bowl and then toss with the dressing.
Friday, September 3, 2010
Make a Baby Blanket
This is a really cute gift to give when a friend has a new baby. It is a finished-edge baby blanket (as opposed to the ragged-edge tutorial I posted awhile ago).
1. Start by cutting two 1-yard pieces of flannel fabric. I like to use one pattern and one solid piece.2. Sew them wrong sides together, leaving a hole for turning. Clip your corners so they'll be nice and sharp. (See?)3. Turn right sides out. Press the whole thing so your edges are crisp.
4. Then topstitch the whole thing. Make sure to stitch the hole you left for turning!
Thursday, September 2, 2010
Growing Tomatoes
We've got some tomatoes out in our garden! A hot, dry summer made them grow well.
But they crack and split open sometimes. That's weird.
I found a source in Better Homes and Gardens (August 2010) which says that, "A prolonged dry spell followed by rain can cause ripening tomatoes to grow so rapidly that the skin splits. To prevent this malady, maintain constant soil moisture. Water deeply and mulch around plants to reduce evaporation."
Interesting! Guess I should have been watering more regularly all summer! We'll eat them anyway.