We hadn't gotten around to replacing it. Good thing. Because if we had simply replaced it, we would've spend WAY too much money. We may have either purchased a whole new door or just a screen. Probably would've spend at least $80 or so. However, my hubby went to the hardware store and bought a re-screening kit for about $11.
In a few relatively easy steps and the time of under an hour (while the little guy took his afternoon nap!) we had a new screen for our door.
1) Remove the old screen. This is the fun & easy part. Screens are connected to the door with a piece of slightly compressible rubber cord shoved into a groove. Just remove the cord and the old screen pops right out of the door's frame.

 2) Unfold the new screen over the door. It should be sized larger than you'll need. Lay the screen over the door frame (the grooved side of the door you removed the cord from should be facing up).
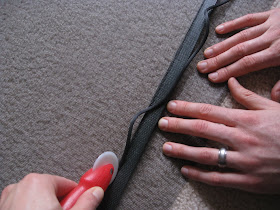
 3) You'll need two people for this next part. One person takes this round tool that looks like a pizza cutter (ours was made of plastic, it isn't sharp). One end is concave. Starting in one corner, person #1 will use this end to force the compressible rubber cord into the frame's groove. The second person makes sure that the new screen is taught and flat as person #1 continues around the entire frame. This takes some patience and is the most time-consuming step. It also gave my wrist a workout.
 4) Using a utility knife, cut off the extra screen all around the perimeter of the frame.

5) Clean up, put the door back together and you're done!
Cost: $11.
Glad we did it ourselves. Now you can, too!

No comments:
Post a Comment
Spelling or grammar will not be criticized, so there's no reason not to leave me a comment!