Pages

Showing posts with label guest post. Show all posts

Friday, January 27, 2023

Featured: Money saving idea!

 I had an idea featured on another website, Hip2Save:


https://hip2save.com/2023/01/27/this-reader-repurposed-an-unexpected-item-for-organization/# 


Tuesday, November 20, 2012

Guest Posting at SYTYC

I'm guest posting at So You Think You're Crafty (SYTYC) today!


I'm showing how to make some nifty zippered pencil cases. Come check them out!

Friday, March 30, 2012

Guest Post Today!

Kristen, a high school friend of mine, has a great recipe blog called "Confessions of a Not-So Domesticated Newlywed". I'm guest posting over there today!

I could probably pull up some pictures of us as far back as second grade, but I really don't think either of us want those floating around blog land (I'm pretty sure we both had some awful '80s bangs)
Here we are at our high school reunion a few months back. 
See you back here next week. Thanks for reading my blog.

Monday, August 8, 2011

Guest Post: Tutorial for Shirring

Hi All! My name is Abby and I'm here from GouldThreads. This is my second guest post here on Monkey See Monkey Do! You might remember my first post from just a few weeks back on how to crochet flowers.

Today I will be showing you how to turn an old t-shirt into a new shirt, skirt, or dress! My sister Kim first made herself a skirt after reading this post from "sew like my mom". Kim then showed me how to make one, and now I am going to show you!!!

Before we get started I must warn you that I am NOT a sewer! I knit, I crochet, but I do not sew. If you are interested in seeing some of my knit or crochet creations you can find me by searching for GouldThreads on Facebook or visit my Etsy site at http://www.gouldthreads.etsy.com/

Ok, back to our tutorial. Like I was saying, I'm not a sewer. In fact I don't even own a sewing machine (but I did borrow my sister's for a week to make the items that I'm about to show you, Thanks KIM!!!!).

Sewer or not once you get started making your own upcycled skirts, shirts, and dresses you won't want to stop! They are that EASY and FUN to make.

To get started you will need: elastic thread, a few bobbins, a spool of regular thread, some old (but nice) t-shirts, and a sewing machine.
If you are making an adult skirt or shirt you will need a men's t-shirt size Large or bigger. If you are making a child's dress, shirt, or skirt you will want to use a women's shirt size small-XL depending on the size of your child.

I happened to go to my local thrift store and bought 2 men's shirts for myself and 2 women's shirts for my 1 year old daughter. I believe that I got all 4 shirts for under $4!!!!

Here is one of my old shirts that I turned into.....


This Dress for my daughter! The shirt was a women's size small and was the perfect length for a dress for my nearly 1-year old.

Ok--are you ready to learn how to make one for yourself? Here we go!


First you will need to hand-wind a bobbin using elastic thread. You will probably want to wind several bobbins before you start sewing. I think I used 3 or 4 bobbins to make myself a skirt and just 1 bobbin for each item that I made for my daughter. I have to admit that this is the worst part of the entire project but push through the frustration, it will be worth it in the end!

Be careful not to pull the elastic while winding it or it will be all stretched out and will not work properly.

Next, you want to take your shirt and cut it off right under the armpit (or lower if making a skirt for a small child)

Once your bobbins are wound you thread your machine like normal and begin to sew! I started with the edge of my foot petal on the edge of my fabric. I also started each row near a seam and back petaled a few stitches to hold the thread (please forgive me if I am using incorrect lingo, like I stated earlier I don't typically work a sewing machine!)

As you can see in this picture the material will start to scrunch up as soon as you start to sew. Those little scrunched up rows are so addicting you might just get carried away!!!!

Once the first row is complete cut your thread and begin a second row the same as the first (near a seam with a couple of back stitches). I worked each row so my foot petal followed along the previous row (about 1/4 inch between rows).

As you sew gently pull the fabric so that the new stitches are sewn into smooth fabric and not into the scrunched up fabric.
Work as many rows as you want. I used about 8-12 rows depending on the project.


Here is a skirt that I made for my daughter from one of my old shirts.

So here is the finished skirt! Sorry that I didn't get a photo of her from the front. My daughter is almost one now and very busy, too busy to stop and get her picture taken!
This is a skirt I made for myself using a man's size Large shirt. In person the skirt is kelly green, I'm not sure why the photo turned out like this. Anyways, I love it! Its super comfortable and easy enough to dress up with cute shoes and jewelry!

I am a pretty small person so you may need to use a men's XL shirt for yourself for extra width or length. I just walked through the thrift store holding men's shirts up to my waist to find one that I thought would work. If you don't mind doing a little more sewing you could even buy some cute fabric and sew a seam up the back and hem the bottom.
Here is shirt I made for my daughter! This was originally a 3/4 sleeved women's shirt, size small (another thrift store find). I just love the colors! If you want to add a halter strap like I did just take some of the left over fabric and sew to the inside of your shirt or dress.

I hope that you found this tutorial to be helpful. I was telling a friend of mine about these skirts and shirts and she suggested shirring the top and bottom to make an adults tube top! What a great idea, I just might have to try that next.


Monday, July 11, 2011

Quick and Easy Pillowcase Alteration!--Guest Post


Hello Bloggers!

My name is Sarah Allman and I am the creator and founder of
B.I.B.S. (Baby Items By Sarah).
I hope you will take a few moments to learn more about my company by
visiting the links at the end of this blog!

I am so excited to do a guest post for Monkey See, Monkey Do and I hope you enjoy my
tutorial below for a quick and easy pillowcase alteration!


My daughter absolutely loves her toddler sized pillow but the pillowcase that came with her new toddler bedding was for a standard sized pillow. Nothing a few quick adjustments with the sewing machine can't fix!


First measure from seam to seam both width-wise and length-wise. This toddler pillow was 16" length-wise and 12" width-wise.


This alteration can be done in just two straight lines with your sewing machine!

Turn your pillowcase inside out and pin the open edge together to keep your seams straight; add a few extra pins along the way to keep your material together. Starting from the open edge, measure 17" (add a half an inch to each edge to accommodate for your seams) inwards. From the bottom edge of the pillowcase, measure 13" upwards (add a half an inch to each edge to accommodate for your seams).


It does not matter which seam you start with, but line the edge of your foot up to your markings as shown in the above photo. When you reach the end, you can either keep your needle down and pivot the material under the foot so you don't have to cut your thread, or you can finish the edge and turn the pillowcase and sew the other seam.


Trim your material about a 1/4" to 1/2" away from your seam.


Turn your pillowcase cover right-side out and voila!


How B.I.B.S. Began:
My Mom and Grandma taught me how to crochet at a very young age. I always loved to make afghans during the winter months and as I got older I began to make baby blankets for family.

In May of 2009, I gave birth nearly two months early to our daughter. As a result, she spent three weeks in the NICU. During that time I became incredibly touched by the people that donated crocheted beanies for the preemies to wear during their hospital stay. In an effort to give back, I spent the next months crocheting tiny beanies and by Easter of 2010, my husband and I made a trip back to the NICU in St. Louis where Ava was born and donated a hat for nearly every day that Ava was there (I was ONE short!). My love for crocheting and children has since developed into B.I.B.S.!

Find me on Facebook for the latest products and specials!
http://www.facebook.com/pages/B-I-B-S-Baby-Items-By-Sarah/
154525424566359


Visit my Etsy Store!
http://www.etsy.com/shop/babyitemsbysarah

Thanks again to Jen for my guest post!


Friday, July 8, 2011

Guest Post from Michelle of Delicate Construction


Hello Monkey See, Monkey Do readers!!! I am soooo happy to be here!!


My name is Michelle and my blog is called Delicate Construction! I am a wife, mommy, full time caregiver and teacher living in San Diego, California. I blog about crafts, family, decorating, and kids activities in various features and linky parties; Made by Little Hands Mondays for the kiddies and Delicately Constructed Fridays for the Mamas! I also love to share tips in one of my favorite weekly posts; 10 New Uses Tuesdays! I would love to have you come visit!! I am also always looking for guest bloggers for my Sunday feature and interviewees for my Seven on Saturdays!


But back to the crafting, it is why we all gathered here right?!


I am going to share a tutorial for my 'his' and 'hers' pillow cases I made as a kind of cheeky little joke...cause I am like that. 


Cute right?! It is funny because of the drastic differences in my husband and my pillows... can you tell now?


Do you see it?! My husband is a self proclaimed pillow SNOB. LOL. He likes the expensive plush, good for your posture blah blah blah and mine is flat and dilapidated. I think it has a lot to do the way we sleep, he sleeps on his back and does.not.move. I sleep on my stomach and I am surprised I don't end up down the street from how much I toss, turn and change position, a big pillow would just get in the way. So needless to say when, on the rare occasion our pillows get swapped, he is quick to switch them back so I thought I would give him a little laugh and make some new, labeled to avoid confusion, pillow cases. 


(did I mention sarcasm is my second language, even in sewing, because it is...just sayin' lol)


And here is how I did it:


Materials:


  • Pillowcase (I made mine using this tutorial from Made)

  • Letters (any template you have, I made mine from word art in Microsoft Word)

  • Steam a Seam or other fusible webbing or iron on seam

  • Scissors

  • Sewing machine

  • Iron

  • Pen


Here is the starting pillowcase I made, you will want to take into consideration which way you like the openings, we put them both facing out, some do it facing the same way. It matters when you go to add the letters and which direction they are sewn on. 


Cut out your letters or use a pre-made template, in Microsoft Word there is word art that is just outlined block letters and I typed in my words, enlarged them and printed them out. 


Next, (this is dependent on what you use, I am following my package directions for the next couple of steps) trace your letters on the steam a seam BACKWARDS, also make sure this is the side that webbing is connected to on the underside.


Since mine fit on one page, I then cut them apart. 


Next, lay out your white fabric (or whatever you are using for the letters) FACE DOWN and iron it to warm it up. 


Then, peel off the underside of the paper and lay the webbing/ second paper that you traced on, on top of the fabric. 


Then, carefully cut out your letters once again with the fabric. 


Now, you are ready to iron them on but I found it difficult to eyeball it with the pillow case laid out flat so I turned it over and folded each edge to the center, kind of like bias tape.


Then, flip it over, this was much easier for me to eyeball the center for the placement of my letters.


Then, arrange them how you want,


and iron them down in place. 


Last, all you have to do is sew very close to the edge as best  you can, just to make sure everything stays in place. 


Now, they are all ready for a laugh! 


I will do a lot to make that hubby of mine chuckle. 


Thanks Jennifer, so much for having me today!! I really appreciate it!! I hope to see all of you over at my little corner of the internet soon!!


Saturday, July 2, 2011

Guest Posts Wanted!

If anyone out there in blog land would like to submit a guest post for Monkey See, Monkey Do! during the month of August, that would be fantastic.

I'm due in less than two weeks with our second child and we're moving into our new house the first week of August...and I really don't want my blog to be empty! Contact me if you are interested.

Thursday, June 30, 2011

Guest Post from Abby of GouldThreads


This post is from my friend Abby! She has a great tutorial to share with you today on making crocheted flowers. I love that you can use yarn scraps for her project! Make sure you check out her Etsy shop and Facebook sites. Not only is she fantastic, she has such cute pictures of babies & kids modeling her creations!

Hello! I'm Abby Gouldsbarry from GouldThreads. I'm thrilled to be a guest on Monkey See Monkey Do! Today I'm going to show you how to create adorable crocheted flowers. They are so cute and easy to make. I use mine to make girls hair clips but you can use them for homemade bookmarks, appliqués, decorations--you name it!

I first began crocheting in college with some friends and later taught myself how to knit as well. This winter I opened my Etsy shop and began to sell some of my creations. Some of the items that you will find in my shop include hats, accessories for boys and girls, and newborn photo props. I also take custom orders. I just LOVE making new items and always aim to please! You can find me on Facebook by searching for GouldThreads or visit my Etsy site at

Happy crocheting!!!

One of the great things about these flowers is that you can use just about any yarn and any size hook. You can use 1 color or 2. I am using 2 for this tutorial (MC-Yellow, CC-Pink). The MC will be for the center of the flower and the CC for the petals. For this tutorial I am using Red Heart Super Saver size 4 yarns and a G hook (4.25 mm). Bonus: This is a great way to use up some of your yarn scraps!

To make a flower of your own: Using MC (yellow in my picture) Chain 2. 5 SC into the 2nd chain from hook. SL ST to first SC. Switch to CC (pink in my pictures) and pull up a loop (see picture above).

Here is what it will look like once you have your CC on the hook. Notice how you have 4 tails hanging (2 MC and 2 CC). I like to pull the tail of the MC tight to secure the CC. Once the CC is secure you can cut the MC from its ball leaving a 1 or 2 inch tail hanging.


With CC, *SL ST to next stitch. Chain 2. 2 DC in same stitch (I DC over the tail of MC that I just cut and the CC). SL ST again in same stitch. It should look like the above picture.
Repeat from *4 times for a total of 5 petals.


SL ST to bottom of first petal. Fasten off and weave in loose ends. TA-DA! That's it. What a simple and sweet little flower.


I like to use my flowers to make hair clips like the ones sold here on my Etsy site.

Here is a bookmark that I made using a crocheted flower and heavy cardstock! I just used a glue gun to adhere the flower to the cardstock. What a simple and unique gift!

Thanks for reading and trying out my tutorial!
Please remember to check out my sites on Facebook and Etsy!

Tuesday, June 21, 2011

Ruffle T-Shirt Skirt

In case you missed my guest post at Couturier Mommy last Thursday, here is a repeat of it.

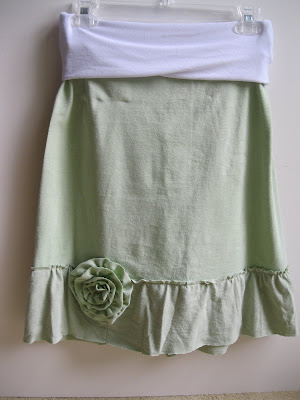
I made this skirt out of two t-shirts. They were both a pale green color--not my favorite but this was an experiment that turned out well. I used a piece of stretch jersey (5% spandex) for the waistband.
T-Shirt Ruffle Skirt #ruffleskirt #t-shirtskirtwithruffle

skirt made from t-shirts


I used these two shirts. The second one is my Cleveland Half Marathon shirt. I was sad to cut it up but it had some fading by the neck, so I decided to give in and cut it because it matched this one:


I took a picture of it for nostalgia's sake. I can move on now!


First, I cut the fabric for the ruffle. I made my ruffle 4" wide and without any hemming on either side. I don't really love hemming, and jersey fabric won't fray!


I cut the skirt from the larger of the two shirts. The waist is large enough to fit around the largest part of my hips with an extra inch for seam allowance. I left the hem of the shirt on the bottom of the skirt. The ruffle will cover it up. I made the skirt A-line by just eyeing it up and cutting a straight line down the edges.


Next, I attached the ruffle around the bottom of the skirt. I pinned it over the hem of the t-shirt.


This picture shows how I tried to 'just cover' the hem so the skirt would be as long as possible (I'm a tall girl!)

To make the flower, I took strips of 1.5" wide t-shirt fabric, gathered it, and then cut a circle the diameter that I wanted the flower embellishment to be. I pinned the first row of ruffle around the edge of the circle.


I started sewing that row and kept sewing in a circle (without pinning). I tried to keep each subsequent row of ruffles close enough to cover the last row's stitching, if that makes sense.


There's the finished flower! I attached it to cover the seam of the ruffle (which ended up in the front and off to the side a bit).


The next step is to make the waistband. I made it a lot tighter than I thought I'd need it (this was an experiment...) but it worked really well. I usually make my yoga skirts to fit my waist minus 3". This time, I made it minus 6" and it is very comfortable, yet secure.

Cut two pieces of your waist's fabric to be 14" tall and then your waist measurement minus 6" (x-6).


Sew up the 14" sides with right sides together using a stretch stitch. Fold the waistband over with wrong sides together.


This next part may be a bit unconventional, but I wanted to only gather the back of the skirt, leaving the front part flat. I gathered the back part just enough so that the fabric diameter of the skirt's waist matched that of the waistband.


Then, I pinned the waistband in place (right sides together).


I used a stretch stitch to attach the waistband to the skirt. This is the outside view.


A stem iron will help to rid the skirt's waistband of wrinkles.


Here's a picture of the finished skirt from the back (waist is folded over).


Here is the front view. I like how the flat front looks.


It's been so fun for me to experiment with 'found' fabrics like "upcycled" t-shirts and other clothing.