Pages

Showing posts with label paint. Show all posts

Wednesday, October 28, 2015

Painted Herringbone-Patterned Canvas...2 Ways.

I bought these two square canvases at a thrift store probably a year and a half ago. They had baby-themed seahorses and other items on them. 

I painted over them with white primer and then did a herringbone pattern. The first pattern was intended for the kitchen. But I thought it was too 80's-esque. At least, my husband thought it was very 80's. So I painted over it. So the blue one, seen here, does not exist. 


Then, I went with green. And with four rows. And yes, it's probably just as 80's-themed! But somehow I like it better. I just need to hang it somewhere. 
I followed the instructions from this project.


And I'm sure it's hard to tell which you like better, since it isn't hanging on the wall yet, but what is your opinion? Which color scheme is better? 

Even if I decide I dislike the green pattern as well, I've only spent a few dollars on the project. And I could probably re-repaint the canvases again. 

Monday, August 10, 2015

Living Room Updates (New Pillows!!)

A few months ago, my husband and I rearranged our living room. We really just moved the couch away from the wall and moved the coffee table out, replacing it with an ottoman. (I wish it were the type of ottoman with storage inside, but it isn't.) I wanted to make new pillows and covers to replace these pillows which I made two years ago. 

Thursday, May 30, 2013

Turning a Dresser into a TV Stand

We have a guest post from my friend Abby, who has a handmade crochet business called GouldThreads. You can check her out via my sidebar or her links below! She's sharing how she and her husband turned an old dresser into a TV stand.
-----------------------

Hi Monkey See Monkey Do fans, I'm Abby from GouldThreads.  I blog about my crochet (and some knit) creations but also enjoy other crafts and DIY projects.  Today I'm here to show you how to turn an old dresser into a new TV stand

Monday, January 14, 2013

T-Shirt Update: Bicycle

I am on an upcycling kick.
What I actually mean: the clothes I have stored in our linen closet with the intent to upcycle tumble out on me every time I open the closet. So I have to get started on these projects!
If you are also interested in repurposing clothing, upcycling the worn out shirts, jeans, etc you have been saving, or just making things without spending money, you’re going to love the next few weeks of posts here on Monkey See, Monkey Do! You've already seen the tunic refashion I shared last week. 

Wednesday, September 19, 2012

Chalkboard Topped Desk


We've started homeschooling at our house. Our oldest is only three, so it isn't exactly rigorous. I wanted to make him a fun workspace. But I didn't want to spend much money. We decided to start with this desk we've had in our garage for a year. My parents were going to burn it, but I thought we might want it. This is the before:

We decided on a chalkboard top. I had some chalkboard spray paint on hand, so I used it. 

Tuesday, September 11, 2012

Thrifted & Spray Painted Mirrors

 I got these mirrors at a thrift store. I am not usually one for thrifting. However, I went into the store looking for something specific. I didn't find what I was looking for. But I found these. I knew that with a little paint, they would make a good birthday present for my mom. 

I failed to take a 'before' picture. But I spray-painted these black, so they looked like the went together.

And for a few dollars, I have a pretty cute gift for my mom. 

Monday, August 20, 2012

Boy-Theme Onesies

I embellished some onesies that are boy-themed as some baby gifts. I made a few extra to sell.
Embellished onesies  (8)

Friday, July 27, 2012

Bike Bag with Freezer Paper Stenciling

bag with painted negative stencil bike
More freezer paper stenciling. More bikes. However, this technique is slightly different than other freezer paper stenciling I have done. This uses the cutout piece of the stencil. It’s painting around the stencil instead of just inside of it.

Monday, July 2, 2012

Little Boys’ Fire Truck Shorts

My energetic three-year-old thinks firefighters are super interesting.
He actually calls them “pirepighters”.
Anyway, I had some red twill (that I got for free!) He loves when his clothes have pictures of trucks, diggers, or basketballs, so I figured I’d try something with fire trucks. boys' fire truck shorts. DIY (23)
These shorts were an instant hit.

Monday, June 18, 2012

Matching Freezer-Paper Stenciled Bike T-Shirts

embellished t-shirt for boys with bike
I love to make things for my boys. Both of them have summer birthdays and I had plans to make them special birthday shirts that matched.

Thursday, May 17, 2012

Baby’s Room: Finishing Touches

nursery decor hat rack (1)My little guys still live in totally white-walled rooms.  I haven’t even considered painting. Just seems like too big of a decision to pick a paint color. And too big of a job to move all the furniture, mask, and paint. Especially since we just moved in last August. 
So I keep making their rooms cuter by adding touches to the walls. I made the hat rack above by taking a piece of white moulding, spray painting it, and adding some hooks. Actually, my husband added the hooks when he hung it.

Thursday, May 3, 2012

Gifts for Men: Bike or Car Storage Bag with French Seams

My brother’s birthday was last weekend. I wanted to make him something special and was sort of at a loss. I decided to make a car tote. He can attach it to one of the headrests in his car. I don’t know what he can put into it…maybe cans of tennis balls? His lunch? Anything he doesn’t want to roll all around the back of the car, I guess. bike or car tote with french seams and freezer paper stencil of bike (5)

Friday, April 6, 2012

Tuesday, March 20, 2012

“Things that Go” Wall Art

My husband doesn’t see the need to decorate bathrooms.
I respectfully disagree.
Boy Theme Wall Art
I wanted to do something for the blank white wall in my boys’ bathroom. I had these 8x10” canvases that I had purchased in December with the intention of making Christmas presents for relatives featuring the boys’ handprints. That project failed miserably.
Truck Wall Art
So I took the materials I had purchased for it and created these simple vehicle silhouettes. Bike wall art
First, I painted over the handprint smudges with navy paint. It took lots of coats. I apparently had a cup of tea, too.
IMG_4658
Oh yeah, and this project was almost a fail. I found out the hard way that you can’t use freezer paper to stencil on painted canvas. So I had to re-paint the canvas to cover up the failed freezer paper stencil attempt.
So now that my canvases were carefully coated with about 15 coats of navy paint, I bought a roll of clear contact paper and cut my stencils out of that.
And by the way, it killed me to have to buy something…I’m usually able to come up with materials I have or someone shares with me. So I spent $7 on contact paper, making this an un-frugal craft. But I’ll figure out some other uses for this contact paper.
Anyway, I cut the stencil on my self-healing mat. I had printed the pictures off of the internet. I taped everything down so there was no shifting.
IMG_4707IMG_4708
Anyway, after cutting the stencil, I carefully took the contact paper and applied it to the canvas. Then I dabbed paint all over it using a foam brush.
IMG_4705
I couldn't wait to see how my canvases looked, so I removed the outer portion of the stencil first, before it was dry. I peeled off the little pieces later after it was [mostly] dry.
IMG_4706IMG_4710
I hung them in the bathroom using adhesive strips. IMG_4743
Why not nails? It just seemed like overkill since they are so lightweight.
Also, it was naptime. Why ruin things by using a hammer? IMG_4715
Lesson learned: You cannot use freezer papers stencils on top of paint. One more time: Freezer paper will not adhere to painted canvas.

Friday, March 16, 2012

Freezer Paper Stenciled Dish Towels

freezer paper stenciled dish towel with bike
This is an easy, fun project! You’ll need some plain towels. I have had some stashed in my fabric collection for quite awhile. I bought these from Target and JoAnn Fabric for only a few dollars.
IMG_4509
Pre-wash and dry your towels. Assemble your supplies: Freezer paper, paint, fabric paint medium (if necessary, more on that in a minute) and any ric rac trim or ruffle trim you wan! Follow my tutorial on freezer paper stenciling.
One major tip I would like to give for the freezer paper stenciling:
You don’t want to use straight-up acrylic paint for most fabric projects. It gets really stiff when it dries. I did not know this and ruined another project.
IMG_4587.1
If you want to use acrylic paint, you can add a fabric paint medium to your acrylic paint. (That’s what the arrow is pointing to in the above picture.) It won’t be all stiff and weird when it dries. It’s just better.
You can buy special fabric paint, which I have used in the past. It works well, but it’s more expensive and you get less paint in the bottle. For this project, I spent a little bit of money on the fabric paint medium and was able to use various colors of paint I already had to decorate the towels. As you know, I'm all about crafting on a budget.
Anyway!
Do your freezer paper stenciling.IMG_4588 IMG_4589 IMG_4591
IMG_4592
Let the paint dry before adding the ruffle or ric rac embellishments!
Once everything was dry, I added some ruffle or ric rac trim to my towels. For the ruffles, I just gathered a 1.5” strip of fabric and pinned it to the towel.
IMG_4593
Then I stitched it to the towel.
IMG_4594
Finally, remove the original gathering stitches with your trusty seam ripper.
IMG_4596
Make sure you iron the paint 24-48 hours later to 'set' it. That way it won't run after washing.
Enjoy your new towels!
IMG_4584 IMG_4600
The green paint didn’t cover the pattern on the fabric well. I might re-do the stenciling in red so it will cover better.
IMG_4604
I especially love how the bike towels turned out. Living life with a husband and two boys means I can’t decorate with flowers and bows.
dish towel with bike stencil
But I do love the ric rac.
IMG_4586

Thursday, March 15, 2012

Freezer Paper Stenciling Tip of the Day

While working on my latest project, which will be posted in the next day or so, I discovered you can re-use your freezer paper stencils.

This is exciting, yet sad, since I have always thrown mine away after one use. I am now mourning all the stencils I could have re-used. (Like the bike stencils I used to make my husband a shirt for Christmas. I could use that one right now!)

I found this tidbit of information out when I tried to re-position a stencil. Instead of recutting the stencil, I just thought I'd try to restick part of it.

So this means that if you are positioning a stencil and you iron it down, then change your mind on the positioning, you can peel it up and re-iron it before painting.

I guess I'd better get a used stencil storage system started!

Tuesday, March 6, 2012

Budget Wall Art Update

I was {finally} hanging my wall art in our bedroom last week.

But the original scrapbook paper birds I’d made just weren’t looking all that good to me anymore.

So I decided to get some pictures printed. I could look at cute pictures of my boys all day long, so why not put them on the wall?

I had already spray painted some frames, but I rounded up a few more and sprayed them with the same lilac paint. IMG_4472 I printed out all the pictures in black and white. That gave them a nice uniform look. IMG_4473

I hung all of these myself! {SO PROUD!} I measured and leveled, too! My two-year old was super impressed to see his mommy using a hammer. IMG_4475

The frames are all inexpensive and printing pictures in either 4x6” or 5x7” sizes is inexpensive, so this project cost less than $10. I bought some of the frames at a yard sale last summer and some of them I already had. Printing the pictures only cost a few dollars.

Friday, February 10, 2012

Old Picture Frame into Cork Board
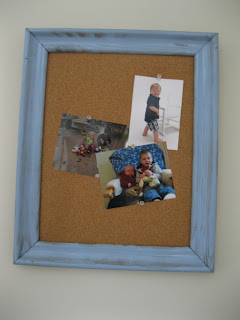
There were some old picture frames in our barn. I took one of them that had no glass and [partially] spray painted it and then cut a cork board to fit in the empty space.

DIY Cork Board
For some reason, the paint didn't stick to all of the wood the first time. (I didn't bother priming it, so that's probably why it looked this way.)
Instead of recoating, I decided I liked the 'weathered' look it yielded.
cork board from old frame
I hung it in my toddler's room so we can put pictures and cards on it!


Wednesday, February 1, 2012

Freezer Paper Stenciled T-Shirt Sleeve Pouches with PLAID Paints

IMG_3770I came up with a new way to decorate drawstring pouches made from old t-shirts. (To sew the pouch, see the tutorial I posted here.)

**Regarding the original tutorial to make the pouches, I thought of a time-saving tip. When making the drawstring, use t-shirt yarn (tutorial to make your own here) instead of sewing tubes of scraps and then turning them.**IMG_3767

Anyway, to do the stenciling, assemble your freezer paper stenciling supplies. You do not need to use 'special' fabric paint. I used PLAID acrylic paint and it works fine for fabric.

IMG_3756

My tutorial for freezer paper stenciling is found here.

I used small paper punches to make my stencils (a butterfly and a star).

I laid out my scraps and waited for the stencils to dry before sewing everything together.

IMG_3757 IMG_3758

The very last step is to use a hot iron to set the paint. That way if you need to wash the pouch, the paint won't run.

I really love how they turned out. They are super easy and practically free to make! They make great storage for the zillions of tiny pieces that come with toys.

IMG_3769 IMG_3771