Pages

Showing posts with label tutorial. Show all posts

Monday, October 20, 2014

Adding Roll-Up Cuffs To Pants

pants

My son is tall. Our whole family is tall.

My oldest son is very slim. He needs pants with about a size 4 waist and size 6 length.
I fixed a few pairs of pants for him to make them longer. And they roll up to reveal either fleece or flannel on the inside. I love the look of lined pants for my boys.

flannel cuff pants

This was a relatively simple alteration and I wanted to share it in case any readers needs to lengthen pants for their kids. Or themselves. Or husbands.

Friday, December 13, 2013

DIY Fold Over Elastic Hair Ties

hair tie tutorial

I wanted to make a simple gift for some friends and both of my sisters-in-law. I have had some fold over elastic in my stash of craft and sewing supplies for awhile and it has not been easy to sew with (I’ve had several project FAILS!) But I just love the stuff and wanted to use it for something…so I decided to use it for simple hair ties.

Thursday, September 5, 2013

DIY Couch Pillows & Covers [the frugal way]

couch pillow title page
I’ve been wanting new couch pillows for awhile now. I’ve scoured Ikea. (I didn’t like the prints. I didn't like the way all the pillows looked deflated.) I’ve priced new pillows at Target. (Too expensive. Too common.)

Monday, July 22, 2013

15-Minute Headband

15 minute headband title

Do you ever want a project you can just make really fast? Or maybe you need to make a quick gift for a friend. Today.

This is a project that is fast. Plus, it uses scraps.

Monday, June 3, 2013

Simple Baby Quilt Tutorial

finished chevron quilt (125)

Have I mentioned we’re expecting our third child?
Perhaps I’ve neglected to share that news.

Or maybe you noticed in my post about the pleated chevron bags last week…I am looking pregnant.
We’re very excited…right now I’m about 22 weeks into this pregnancy. Too early to nest, but I’ve been thinking about some things I’d like to make this baby.

Thursday, May 23, 2013

Sunglasses Case Tutorial

sunglasses case tutorial (2.1)

After observing a few ideas for making sunglasses cases on others' blogs the past few weeks, I decided to design my own. I knew I wanted it to snap closed at the top. Also, I wanted to use supplies and scraps of fabric I had on hand.

Monday, March 11, 2013

How to Insert Magnetic Snaps

magnetic snap tutorial
I love making bags. But they have to close. I’ve found that magnetic snaps are my favorite closure to add to a bag. They look cleaner than velcro, don’t snag things, last longer, and look better than a zipper.

While making these bags for a friend’s wedding last year, I panicked at the thought of sewing one in. But I learned not to be afraid of using them. They’re easy.

Wednesday, March 6, 2013

Colorful Scrappy Pouches (Old Guest Post)

I originally guest posted back in November on the So You Think You're Crafty blog. I wanted to bring my guest post home. I loved the colors of these pouches.
________________

Hi SYTYC friends! I’m Jennifer and I blog over at Monkey See, Monkey Do! I hope you’ll come visit sometime. Check out my project gallery for crafty and sewing ideas and tutorials I have shared. I wanted to share this tutorial for making a colorful pencil case.
pencil case tutorial with scraps
I like zippered pouches. [See evidence here, here and here.]

Thursday, January 3, 2013

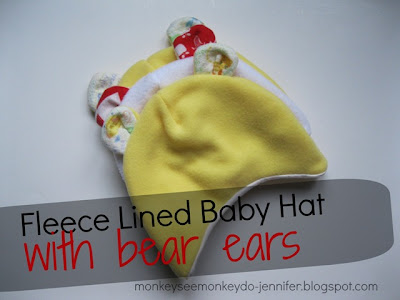
Fleece Baby Hat with Bear Ears


My church makes hats that are donated to newborn babies at the local hospital. Many women crochet these hats, which I can {sort of} do.  I liked this hat (which is crocheted) but decided I would get them done faster if I made a sewn version. This tutorial shows how to use my tutorial for making a double layer fleece hat and add ears.

Tuesday, October 2, 2012

Messenger Bag Refashion Tutorial

free messenger bag re do (30)
Random ugly trade-show items are rampant in our home. We have several bags at the moment that are proudly declaring various company names. We use them for library books or other needs. I decided this orange one (below) needed a makeover! I’m really excited about the result. You might recognize the makeover fabric from these bags.
upcycled bag before and after
Do you have an ugly bag you’d like to refashion? Oh, good.

Wednesday, July 18, 2012

Upcycled Tote Bag: Part 1

tote bag from cargo pants (13.1)
Remember last week when I mentioned I was making a tutorial regarding the bag I have listed in my Etsy shop? Here is part 1! I split the tutorial into two parts because I took so many pictures. I didn’t want them to overwhelm anyone.

Wednesday, June 27, 2012

Drawstring Bag with French Seams: A Tutorial

A good friend of mine is getting married this summer. Her bachelorette party was a few weeks ago. I didn’t get to go, but I wanted to make a gift. I decided to make a lingerie bag.
bride bag for lingerie with french seams (12)

Tuesday, May 29, 2012

Tutorial: Upcycled Striped Bow Tank

upcycled bow t-shirt (54)
I have been wanting some new summer tops. However, the chance to get anywhere to shop has evaded me for several weeks. 
So I raided my [small, yet growing] stash of thrift-store finds.   

I refashioned a striped shirt (it was a long sleeved girls’ size XL). I got it for $1. I took scraps from another t-shirt and made it into this! 

I really love how it is longer, almost tunic-length. I love the vertical stripes at the bottom. I also love that the neckline isn't too low. Which is a problem I have experienced with tank tops sold in various stores.
recycled bow t-shirt (31)

I love my new $1 shirt.
upcycled bow t-shirt (1.1)

Tuesday, April 24, 2012

Gifts for Men: Chisel Sleeve Tutorial

I have a tough time coming up with gifts to make for men.

However, my dad had seen the felt car mat I made my little boy and suggested that the idea could be adapted to store chisels.

So I purchased some canvas, did a little freezer paper stenciling, and cut up an old t-shirt to make the binding. (Every project seems to somehow include an old t-shirt.)
IMG_5293

Friday, April 20, 2012

30-Minute Skirt Tutorial

30 Minute Pink Skirt Made from T-shirt  #skirttutorial #easyskirt #DIYskirt
I made this skirt for a friend’s little girl. It was super easy and really only took me about 30 minutes. Even with the freezer paper butterfly detail. See? IMG_5203

Friday, April 13, 2012

Spring Tank Top from Scraps

striped spring top made from scraps of t-shirts
I made this shirt from scraps of t-shirts.
striped spring top made from scraps of t-shirts
I had the remains of a shirt I bought at Target for $.60 a few weeks ago. I decided to use  the remains of it (I cut off the bottom and sleeves for this project) to make a new shirt.

Monday, February 27, 2012

DIY Hat Tutorial

Hats for young babies are very straight forward to cut and stitch. They just require two pieces of fabric and a brim. I’ve made a lot of those with this tutorial.
However, I’ve always struggled when trying to make hats for older children and adults. Using the same method as the baby hats yields an ill-fitting product, in my opinion.
The hats I’ve bought seem to have this extra seam to keep them from looking too tight or loose around the seam.
I cracked the code for making seamed adult hats. Here’s how I made this cute fleece hat for myself.
IMG_3905
Disclaimer: My pictures for this tutorial were taken in waning afternoon light. So they aren’t my best.
I started by taking a hat that fit me and folding it into quarters. I folded my fabric into quarters, too. (Kind of like you’re making a chain of paper dolls.)
IMG_3873
This is a picture of the fabric folded into quarters:
IMG_3874
I traced and then cut around the hat quarter. Here’s a visual of how your fabric should look. Kind of like a crown. Don’t worry. It’ll turn out a-ok!
IMG_3875
Next, fold the fabric together, right sides together, matching up the points.
IMG_3876
Sew up the side. Pivot your machine’s foot and then continue up the ‘triangle’ and stop when you get within 1/2” of the tip.
IMG_3877
Then you’ll sew the opposite triangle. And finally, finish the last two triangular sides. Sew over the peak of the hat to close the tip.
IMG_3878
Next, I added some blue fabric inside the brim. I did this so I wouldn’t have to hem the hat and also to add some warmth around the ears. I used the hem of a t-shirt so it would have a factory finished edge. I cut two 4” pieces to the width needed and sewed them with wrong sides together at the edges. (This way the seams will be on the inside of the hat and not touching your ears!)
IMG_3879
I then pinned the blue inner brim to the base of the outer hat fabric with right sides together. I sewed it into place.
IMG_3880
After it is sewn on, this is what the outside of the hat will look like. IMG_3881
Turn the hat wrong-side out. Fold the blue brim up toward the hat’s crown. Sew into place.
IMG_3882
This is what the right side of the hat will look like. If you use fleece, it will help to hide the seam.
IMG_3883
Here’s what the inside looks like:
IMG_3884
I added a cute little flower. I love yellow and gray together, so I cut a few pieces of grey knit scraps into irregular shapes.
IMG_3890
I stacked the shapes and sewed them together in the middle with embroidery floss.
IMG_3891 IMG_3897
IMG_4145
That’s it! You can make a hat of any size using this tutorial. (All you need is a hat that already fits.)

Monday, January 23, 2012

Car Appliqué on Backpack

When we had our little boy this summer, we were the recipients of two plain black backpacks containing free formula. We use one of them for our two-year old to carry his quiet activities to and from church each week. I thought it needed a little something special.

IMG_3515

So I added a car appliqué. I used felt and heat and bond; here’s a brief tutorial on how to make your own iron-on appliqués.

I used a car template I printed off of the internet.

IMG_3503

First, I bonded all my felt to the heat and bond. Place the shiny side against the fabric and fuse it. IMG_3507

I cut the large car out of blue felt. I next cut out the windows and wheels to use as separate templates. IMG_3504

I peeled each piece of the heat and bond backing off and then I fused it to the blue felt. IMG_3505

I did this for each piece. And then I added a “3” to the car. IMG_3506

To finish it all off, I peeled the heat and bond backing off of the blue felt.

IMG_3508
Then I bonded it to the bag. IMG_3509

This technique could be used to make any type of appliqué!IMG_3511