
I’m not going to bother posting a tutorial for this project! But I wanted to show what I made for my little guy. He loves belts.
Monday, October 31, 2011

Thursday, October 27, 2011
My Fabric Stash
I use t-shirts and other repurposed materials quite a bit. However, that doesn't mean that I never buy fabric. Here's a few items in my stash that I *LOVE* yet haven't decided on the perfect project in which to use them:
Tea towels from Target. $1.98 for two of them. I couldn't pass them up. I originally thought they'd be perfect in our kitchen, but when they came home, they're slightly 'off' in color. They'll be repurposed somehow.

I won this fabric about two years ago and *STILL* haven't used it. I was considering making ties for my little boys to wear, but that was before my mom brought over a bunch of bow ties my brother wore when he was little. They're super cute, so I'll have to think of another project for this yard of fabric!

I bought someone's scraps on Etsy! There are some great designer prints in this stack:

Wednesday, October 26, 2011
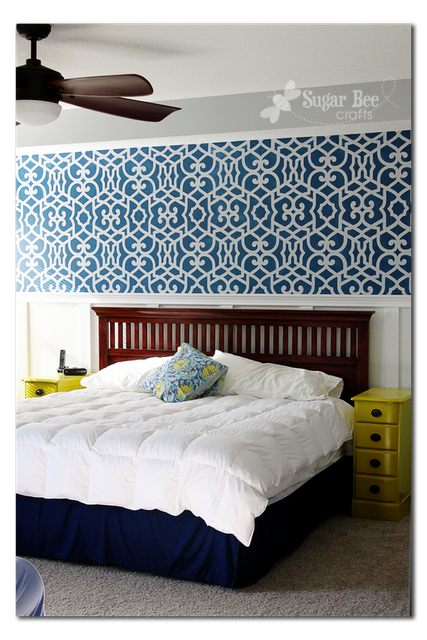
Bedroom Decorating Ideas
This is our bedroom. I like it, but it needs something. I don't know what. Our headboard (you can't see it well, but it's two twin headboards that are about 12" wide) belonged to my grandparents. We refinished both headboards a few years ago. So they won't be changing! And I really love the cedar chest in front of the bed, even though it doesn't match the wood of the headboards!

Here are two beautiful, inspiring rooms I've found:
Those two fantastic nightstands? They were a single desk. So cute!

I love this headboard! I love this whole bedroom! The linens, the lamps, the symmetry of the nightstands...it's fabulous!

We don't need a new headboard, but this room is beautiful.
Tuesday, October 25, 2011
More Zippered Pouches
I made another zippered pouch using upcycled clothing. This one turned out way better than I'd imagined!
Perfect fall colors.

Monday, October 24, 2011
Repurposed T-Shirt Shag Mat Tutorial

This project was a [time consuming] way to create a comfortable, cute mat for my toddler’s room using materials I had on hand.

Do you want to make one???
I started by cutting up t-shirts (you’ll need about 10) in the color scheme of his room. His room also has green in it, but I did not have any shirts in the “right” color of green, so I just used navy, gray, light blue, and white.
I made my strips 1 1/2” x 4”. Using a rotary cutter saves a lot of time.


For the backing, I used a white standard-size pillow case. We seem to have an abundance of pillow cases in our linen closet, so we won’t miss this one! It was a little scratchy for my taste anyway.
Side note: my grandmother always called pillow cases “pillow slips”. I referred to it that way in college once and a few friends made fun of me for years! 

Anyway, draw lines on the pillow case that are 1” apart. This will be the guide you use for sewing on the strips. Do not assume you can sew a straight line without a guide! 
Start sewing on the strips!
To sew on the strips, pinch them in the middle. Backstitch at the beginning and end of each row. My rows run vertically so I could sew fewer strips per row. 

Fold the strips over so that you don’t catch them in the next row of stitching. 

Keep sewing rows of strips until you’ve completed the mat!
This will probably take a long time. You may have to cut more strips. I sure did.

Up close: 

I like how it turned out! I think it would make a great bathroom mat.
My husband made fun of me a bit for taking on this project. I think he wasn’t sure our toddler will use it, considering the little guy rarely sits down!
Thursday, October 20, 2011
Feeling Overwhelmed?
I often add every appealing project to my "to do" list. I am way too inspired by what I see on the internet. This article was good for me.
I really liked the image that went along with it.

Wednesday, October 19, 2011


Tuesday, October 18, 2011
Yummy Recipe for .... Squash??
I've always HATED squash. (With the exception of spaghetti squash.)
However, we are members of a CSA (I forget what CSA stands for...but you join from April-November and get local foods every week.) Whatever produce is in season arrives every Wednesday to my husband's desk at work and he brings it home.
This week, he brought home a butternut squash. I was at a loss of what to do with that, since I *REALLY* dislike squash and all things resembling a sweet potato.

Photo credit: kconnors from morguefile.com

Photo credit: kconnors from morguefile.com

It stared at me all week. I avoided thinking of how I would use it. But last night (at 4:30 am, while feeding my not-so-tiny three month old) I looked up some recipes for butternut squash. Lots had suggestions of tons of butter, brown sugar, or even maple syrup. But in my kitchen, any recipe that starts out with a stick of butter (with the exception of cookies!) will not fly.
Also, some of the recipes called for roasting the squash. From my experience after making baby food, a squash is nearly impossible to cut in half when it is raw. So cutting it in half and placing it in a baking dish to roast for an hour was not in my ability (or time frame!)
The following recipe is how I ended up cooking the squash to suit my tastes.
(Tasty, yet healthy. Not sweet. Could be mistaken for mashed potatoes.)
2 small potatoes, any type
1 butternut squash, any size
splash of milk (~2 Tablespoons)
2 cloves of minced garlic
salt & pepper
1 T butter
1. Peel the potatoes and cut them into quarters. Prick the squash with a fork and microwave it for about 8 minutes, turning it over halfway through cooking.
2. Remove the squash from the microwave and slice it in half. Scoop out the seeds and then take the skin off of the squash. Place the potatoes in a steamer and steam for 5 minutes.
3. Add the squash and steam until all pieces are very tender and mashable. (I made up that word.)
4. Place in a large mixing bowl and use a fork or potato masher to mash the squash and potatoes.
5. Add minced garlic, milk, salt & pepper. Using a hand mixer, beat all ingredients until smooth. Add the butter and beat some more until it is smooth.
I then put it in a casserole dish, covered it, and put it into a 300 degree oven to keep it warm.
I can't believe I actually LIKED squash!
I can't wait to make this again! Finally, an abundant vegetable prepared in a way that I *LOVE*!
Monday, October 17, 2011
Painting and Glazing a Wood Shelf
This was another *FREE* project! This shelf was in the old house we tore down to build this one. I spray painted it and then glazed it to put in our kids’ bathroom. (My hubby, who so wonderfully hung the shelf, placed the pictures on it. I haven’t yet decided how to decorate it, but I’m pretty sure they’ll be moving off of it!)

Here’s an up-close picture so you can see the glazing and antiquing.

Here’s what I started with. I had to strip the old paint and finish (no photos for this stage).

After I spray painted it a dark blue color, I thought it was just too flat. It lacked depth, so I glazed it. To glaze, you just apply a color of paint and wipe it off before it dries. Easy.

This is the paint I used! Inexpensive.

I used a foam brush to apply it and then a rag to wipe it off.


Please note: It is important to let the spray paint dry COMPLETELY before glazing. You will end up wiping into the spray paint coat if you attempt to glaze before the under coat is dry.

After I glazed it, I took sandpaper and rubbed the edges to make it look a little worn. It looks pretty good for a free shelf.
It’s tough to get good pictures in a bathroom!
Friday, October 14, 2011
Improvements to the Zipper Pouch Tutorial
I wasn’t completely happy with my zipper pouch. I made some more, with a few improvements.

Improvement #1: Attaching the fabric one piece at a time to the zipper. I attached the outer fabric first.

Then I attached the lining fabric. This ensures you won’t miss either fabric and leave a hole.

Improvement #2: Press both fabrics after sewing them onto the zipper.
Improvement #3: Open the zipper before sewing the side seams. This makes it much easier to turn!

Improvement #4: Add gussets. This makes the pouch stand up. Here is one with 1” gussets. 

This one has 2” gussets. That made the bottom denim stripe stay on the bottom of the bag. 


Hope these minor improvements help you enjoy your zipper pouches even more!

Thursday, October 13, 2011
Want to Make: Window Coverings
I’ve been thinking about window treatments for our house. The only rooms with curtains now are our boys’ rooms, and that’s just to help keep out the sun!

Love these grommet curtains!

I have no window coverings of any sort in my kitchen yet. I like this idea!
These Roman Shades are cute.
Wednesday, October 12, 2011
I really wish I could wear…


When I was little, I did have a skirt attached to leggings! I loved it!

I just think these girly items are super cute! But they won’t look right on a 20-something mom of two!
Subscribe to:
Posts (Atom)


