Pages

Saturday, October 30, 2010

Adding Sleeves to an Adult's Shirt

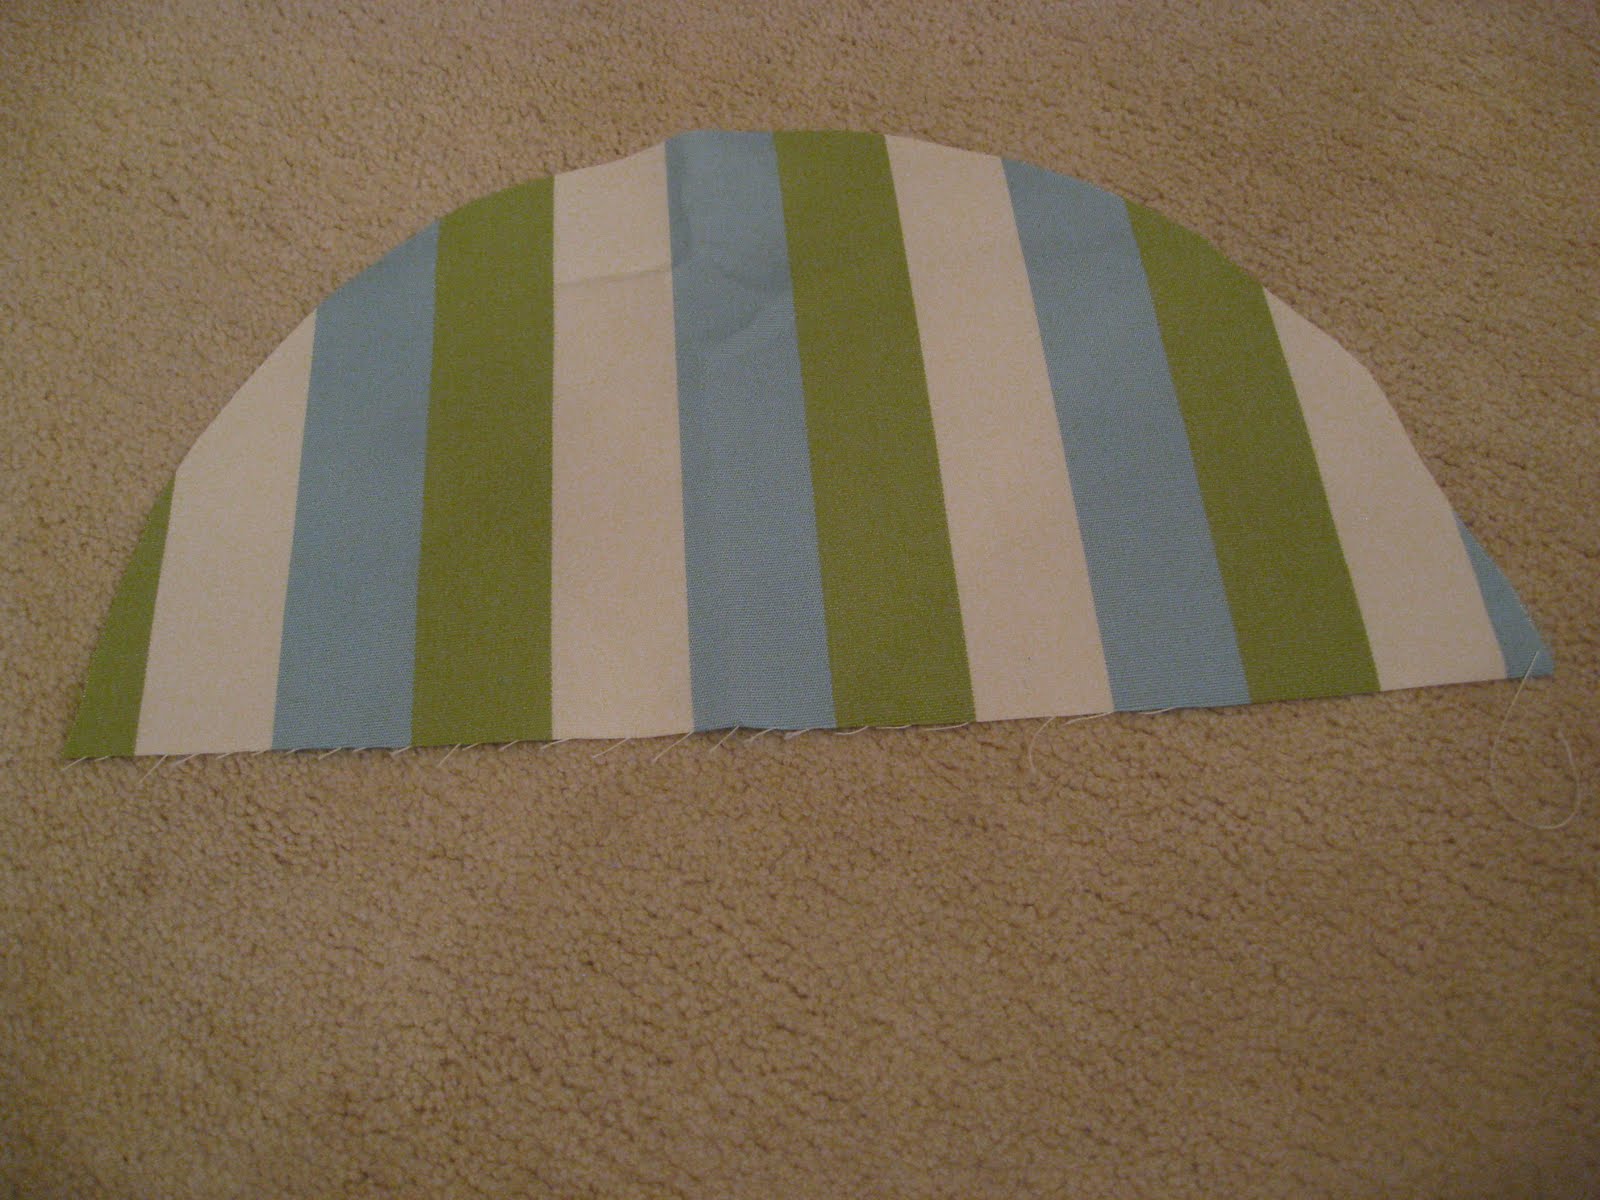
Remember the cute toddler skirt I made about a month ago? I held onto the rest of the t-shirt.
I just liked it.

So I came up with a way to use the rest of it.

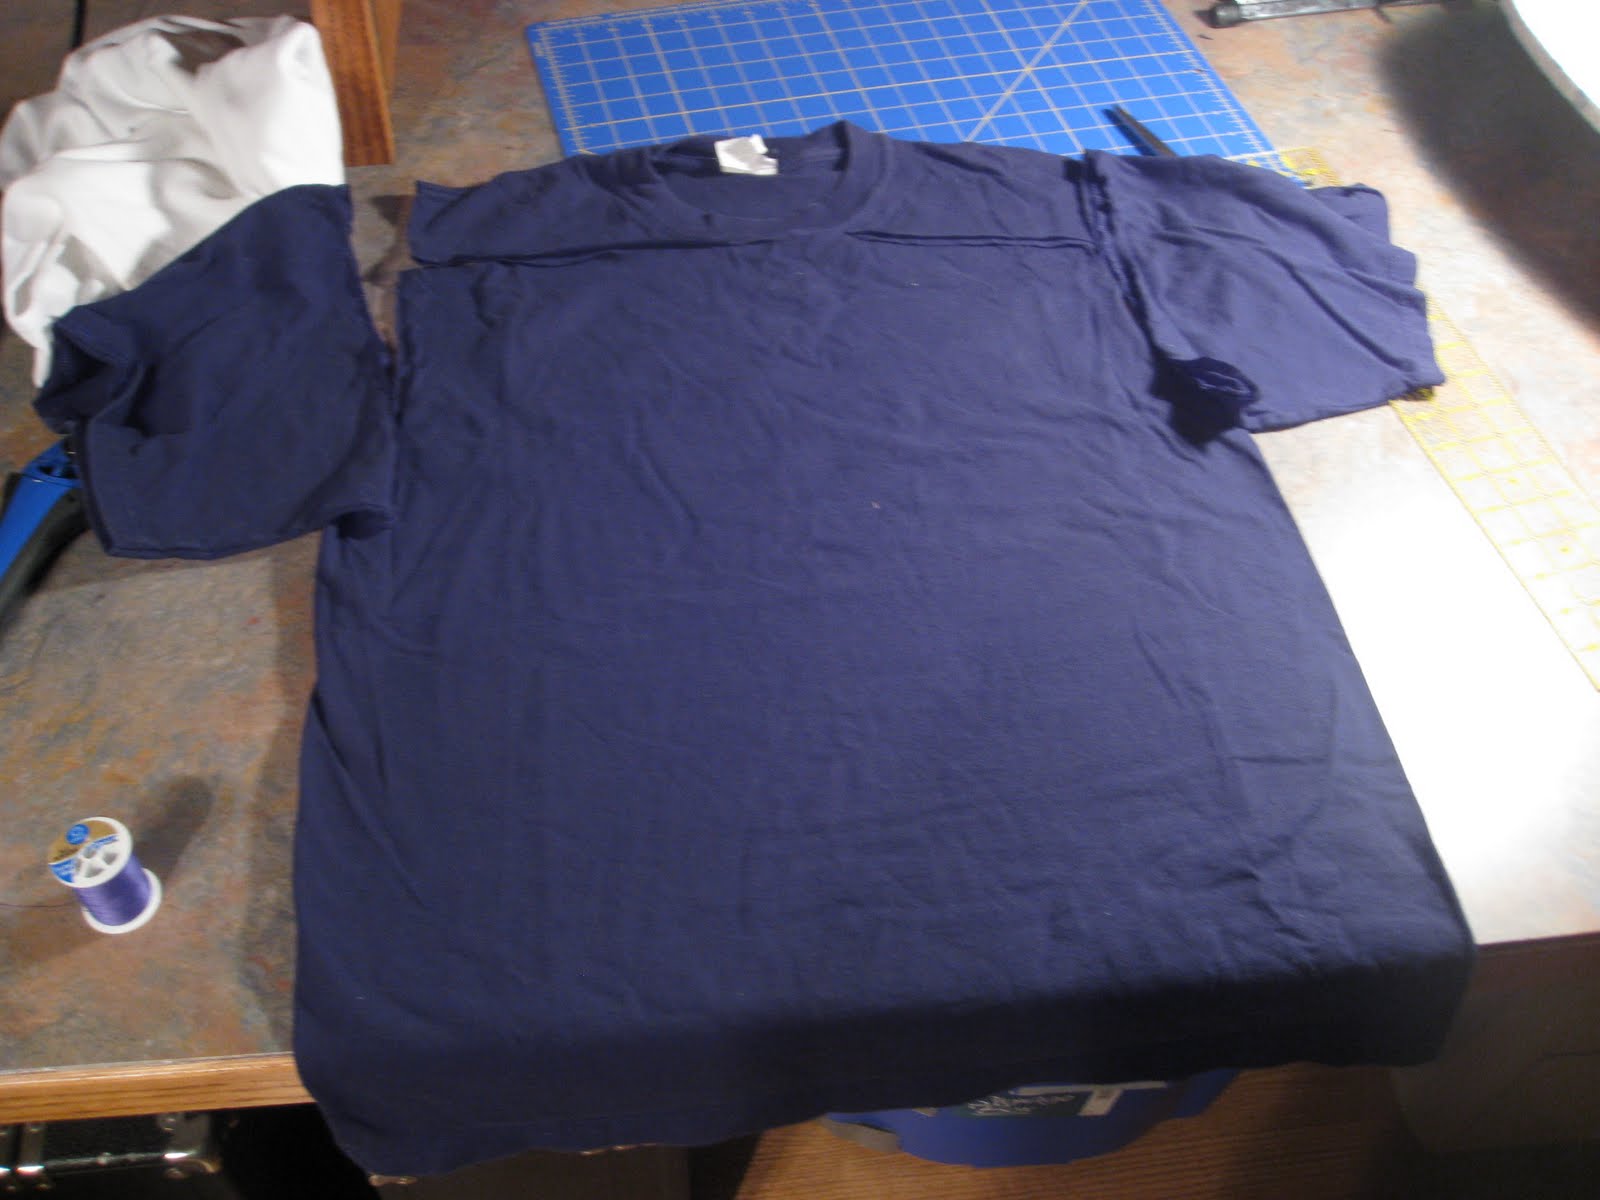
I had a white t-shirt that is short-sleeved. "This could use some style," I thought.
adding sleeves to a shirt
I cut off the striped sleeves at the point where they would match up width-wise with the white sleeves. I pinned them into place. Then, I cut a piece of the neck to help add some color and fabric to the white shirt's scoop neck.
I wanted to add some sort of detail to the sleeves. I sewed two tubes, turned them, and then top stitched them.
This is how I added them. I intend to add buttons to them, too but haven't found just the right ones yet.Here is a sideways view of the shirt. I don't know why my pictures sometimes post sideways!
You may notice I had to switch out the neck piece. It wasn't even!
Then I took out the neck piece all together. It just didn't look right.
Now I have a great mid-weight fall shirt to wear!

Friday, October 29, 2010

Sewing Project: Scarves

I really like scarves. They're fun to make, too.
If you need an easy gift for a friend, try making a scarf. It makes a great first sewing project, too, if you're scared to jump in with something more complicated.

Here's how I made mine:

-Procure 2 yards of fabric. I got mine in the clearance section for $2/yard.
-Fold it in half once (with right sides together) and cut two long pieces. -Pin them together. -Next, sew on your machine. Leave an opening for turning!
-Turn the scarf and make sure you pop all the corners out so they look nice and square.
-Pin the opening closed. Press the scarf nice and flat so the seams are sharp.
-Top stitch all around the edge!
Celebrate! You are done!

Thursday, October 28, 2010

Help, Help! I have a sewing question!

Many times, my sewing machine makes awful jumbles of thread on the back of my projects. This tends to happen when there is more than one layer to sew through. This is an example. A tame example.
Why is this happening? Is there any troubleshooting info out there? My sewing machine is so old that we've thrown away the manual.

Help. Please.

Wednesday, October 27, 2010

Crib Skirt Tutorial


I found a few sites with crib skirt tutorials. I made my own! It even matches our little guy's green dresser which we garbage picked late this summer.
It took some time to make but it wasn't difficult. Here's how I did it.
Note: I made this to fit a standard crib when the crib's mattress is in the lowest position, or 12" from the floor.

Dimensions of fabric needed:
-1 piece of fabric 28"x51". This is the part of the skirt that goes under the mattress. You shouldn't see it when the project is complete and installed in the crib. I actually used an old tablecloth.
-2 fabric pieces 28"x13". This leaves room @ the bottom for hemming.
-2 fabric pieces 51"x13". Ditto on the hemming.

I began with two pillowcases I bought from Target for less than $2. (They're the teal-colored.) I removed their seams to make them flat.

I used a zoo print fabric remnant I found at the store for about $2.50. I loved it but it wasn't wide enough or long enough for the dimensions needed for this project. So I added onto the sides and bottom. I miscalculated the fabric needed to get to 51" so I had to add a bit at the ends, as you can see! I ended up hemming three edges of each panel (the bottom and sides). I 'serged' the top edges. Since I don't have a serger, I used the zig zag stretch stitch my machine has. This may also be known as the triple zig zag. It worked well. Then I attached the edges that show to the middle piece that does not show. I did not sew right sides together; I just attached the edges so that 12" of the showy fabric hung down (does that make sense?) I had some problems with things not being exactly square. So this helped me avoid gaps at the bottom of the skirt.
That was it. I ironed it within an inch of its life. But it could've stood some more ironing. I love it. Now I've gotta make some painted canvases...or pillows...or sheets...something to match!

Tuesday, October 26, 2010

High Chair Cover

This project seemed really hard when I saw the tutorial on another blog awhile back. However, I decided to give it a try because the high chair cover our son uses at my parents' house is a little, well, awful.

I got some upholstery fabric on ebay. I have a ton of it so I decided to try this project using a bit of it. This is the finished product:
This is what the old stuff looked like (it's vinyl, which is more practical than what I used):Here's how I did the new cover.

1. I made a pattern out of a paper bag by tracing the vinyl cover.
2. I cut out a piece of the upholstery fabric and a piece of quilted batting stuff for a cushier layer. I did not cut extra for a seam allowance since I used a binding to finish the edges.

Here's a view of the cushier layer:3. I cut a half-moon shape for the back. The original design was held on by a back pocket flap. 4. I used some binding to finish off the back flap. 5. I laid the back flap in place and pinned. Then I went to the store to buy some more binding!6. I am not exactly sure of the 'right' way to apply bias binding. But I used double fold binding and, after using what felt like 200 pins, sewed it on the front first. Hint: Remove your pins before you sew over them. I have most of mine bent from prior times I've just sewn on over them.
See?
7. Then I folded the binding over the old stitches and sewed it again. This covered my old stitches so there was only one set showing on the top of the binding.
8. I added little elastic feet to hold the 'leg' parts to the high chair. (The high chair has plastic hooks underneath the seat for these elastic feet to grab onto). Done! All ready for my little guy when he wakes up from his nap.

Monday, October 25, 2010

Want to Make: Crib Skirt

I just came across this tutorial to make a crib skirt.
Here's another with clear dimensions.
How cute is this one? Has pleats in contrasting fabrics!!
I bought one for our little guy's crib at home, but since we're at my parents' for awhile til our house sells and we build a new one, he is sans crib skirt.

I think I'll make one. Soon.

Sunday, October 24, 2010

Fun New Fabric

I really love this zoo fabric I just got. I only have 5/8 of a yard, though (it was a remnant). I need to find some more. Or an idea for a small project!

Saturday, October 23, 2010

Handmade Necklaces

I really like to make jewelry. At the request of my mom, I made necklaces for my cousins. She's going to give them as birthday gifts. Strung jewelry is easy to make. Here is an up-close view of the clasp:

Friday, October 22, 2010

Make a Luggage Tag II

Hopefully you saw my post awhile ago about making a luggage tag. I didn't use interfacing. Well, I decided to use some scraps I had left over from when I tried to re purpose a dress a few years back (the re purposing didn't go so well) and decided to make a luggage tag from the scraps. It was just cotton, so I tried some interfacing. I used the same dimensions as before (3 1/2" x 5" and 2" x 12"). I just cut one piece of interfacing 3 1/2" x 5".

First, I sewed the interfacing to the wrong side of one of the rectangular pieces. Then I did just as before, sewed a tube from the long, skinny piece, and then sewed the two right sides together of the rectangles. Next, I turned and pressed the pieces.Then I attached the handle to the rectangle using the same method as before and top stitched the whole thing.

Thursday, October 21, 2010

Appliqued Elephant Shirt

I made an elephant shirt for our little boy. I was just looking for easy silhouette shapes that were boy-appropriate and ended up with an elephant. I didn't think about it being political until I remembered I was attaching it to a red shirt...not sure he'll be wearing it outside the house very often!

Tuesday, October 19, 2010

More Yoga-Style Skirts

Here is the easiest skirt ever! This is an adult-size skirt, too, even better. It's done using the same idea as my original tutorial on yoga skirts. Start with an old t-shirt and cut the sleeves off. I cut it off below the armpits. Use the t-shirt's hem as the bottom.
Here's what you're left with. I had to add an extra panel to make it long enough. I'm a tall gal. I added the panel to the top of the t-shirt to ensure I wouldn't have to hem the finished skirt. I made the waist band out of an old tank top. It had some stretch to it. I made it 3" shorter than my waist measurement so it would fit tightly enough without elastic. Then I just attached it to the top of the panel I added (you can tell from this picture below). I added a little flower and a blue tube of fabric at the bottom for some color. I love blue.
I don't know what's with all my yoga skirt posts lately. I don't even do yoga.

Ironing Board Cover Tutorial

I have had a little ironing board since college. It works great for small sewing projects, but the cover was stained and just downright ugly. I decided to make a new one!

I found a man's yellow polo shirt in the Goodwill pile. I cut it off below the armpits. Then I cut down the side to open it up into a large piece of cloth.
I removed the old, stained cover and used it to measure. I cut an extra 1/2" all the way around the cover for a seam allowance. Then I folded it over 1/2" and pinned it in place.
Then I sewed it into place, leaving an opening to run a cord through (you could use elastic, but my original board used a cord which was stapled to the board). Then I ran the cord and finished it off!
After that
This is the before picture:
This is the after:I'm happy with it. And it didn't cost me a thing!