Pages

Showing posts with label jewelry. Show all posts

Thursday, April 12, 2012

Chewbeads Giveaway-Closed

This giveaway is now closed.
________________________________________
If you are a mommy of a baby, I have a fun giveaway for you.
Have you ever heard of teething jewelry? If not, let me tell you about ChewBeads. I know you will agree with me that it is a necessity for every new mommy you know.

Jane-fslash-Charles Gift Set-1

Monday, December 12, 2011

Braided Jersey Bracelets

IMG_3311

I was inspired to make these bracelets after seeing this tutorial online. However, I did mine using an easier method. I just took a bunch of t-shirt strips, cut them to relatively the same length, and braided them all together. IMG_3300
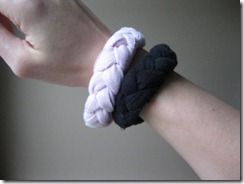
I think I started with about 9 strips, sewed them together at one end, grouped them into three groups of three, braided them, and sewed them together at the other end. To join the ends together, sewed the unbraided ends. To cover the stitches, I took a smaller strip of jersey, turned the ends under, and hand-sewed to close it all together.

IMG_3301

It was a super-quick project. I’ve found I actually wear them often right now. Since I’m still nursing my 4.5 month-old, I don’t wear jewelry because I don’t want to scratch him. These are so soft that they don’t bother him at all.

IMG_3302

Finally, a solution other than going jewelry-less for a year (like I did with my older son!)

Tuesday, August 2, 2011

Memory Wire Bracelet Tutorial

I love memory wire bracelets. They require no clasp and I love to wear cuff-style bracelets. However, you don't have to make a gigantic cuff-style memory wire bracelet-you could just do one coil.

Here's what you'll need to make your own:

Step 1: Bend the end of the memory wire into a loop with the round-nose pliers.

Step 2: String your beads. You may need to un-string them several to get the perfect order and positioning.

Step 3: Stop about 1" from the end of the wire (or, if you're not using the full length of the wire, cut the wire off about 1" after your last bead is strung).

Step 4: Make sure you have no extra space between your beads--push them so they're flush against each other. Cut the wire so there's about 1/3"-1/2" left. You'll be turning this end into a loop to keep everything in place.

Step 5: Use the round-nose pliers to turn the loop at the end. You might have to fool with the end a bit to make a perfect circle.

I could make these bracelets every day! I love making jewelry.


Monday, April 4, 2011

Fabric Flower Necklaces

I guess these are more like "Mixed Media" necklaces...I am already tired of my maternity wardrobe--still have three months til the baby arrives--s0 I decided to make some accessories!

I just made some multi-strand necklaces (see my instructions on crimping here) and added small fabric flowers with beads in the middle.
See this post for how to make fabric flowers. I made these pretty small and left the edges raw since I used knit fabric (scraps from t-shirts, of course!) Then I sewed the flower onto the necklace in an asymmetrical fashion...I wanted it to be off to the side, not in the middle.

Sunday, December 19, 2010

Jewelry Making How-To: Crimping

Did you see some of the jewelry I've made?

This is a key step in making simple necklaces and bracelets. Crimping is how you attach the clasp to both ends of the wire or string. In this example, I used tigertail. I sometimes use fishing line for lighter beads.

You will need needle-nosed pliers (get some especially for jewelry, not the same type electricians use!) , a crimp, clasp and some tigertail.

You will use the pliers to squish the crimp and hold the tigertail together. Thread it in this order: crimp and then the clasp. Then thread the loose end of the tigertail back through the crimp. Squish the crimp with your pliers.
It will look like this:Thread the first bead over the end of the tigertail right up against the crimp.You can buy special 'crimp covers' to cover the crimp, but I usually don't do that.

Thursday, November 18, 2010

Want to Make: Fabric Flowers

No-Sew version!
cute with a button in the middle.
for a shirt.
a fabric flower broach using scraps.
using wire for the edges
Really love this fabric.
adorable garland idea (looks good from both sides, need interfacing)
No-sew rolled flowers
flowers with fabric stiffener! stiff without interfacing!

Here's a great project that just includes fabric flowers: fabric cased necklace! LOVE this!!

A great idea for how to use fabric flowers on a cuff band!

Saturday, October 23, 2010

Handmade Necklaces

I really like to make jewelry. At the request of my mom, I made necklaces for my cousins. She's going to give them as birthday gifts. Strung jewelry is easy to make. Here is an up-close view of the clasp:

Tuesday, September 7, 2010

Jewelry Making: Bracelet

I really love beads. I haven't been making much jewelry lately because I'm afraid my 15-month old will eat the beads. But I needed to re-string these beads and did so during his nap yesterday. I love this bracelet now! Should I bother posting a tutorial for jewelry-making? Or is that something that is too self-explanatory?