
")
Showing posts with label organizing. Show all posts
Showing posts with label organizing. Show all posts
Wednesday, October 9, 2013
Cord Keepers
I pinned this idea a few weeks ago and made these cord keepers just the day before I went into labor with this little guy.
")
Wednesday, August 14, 2013
Small Sewing Projects
I’ve been doing some small projects before we have our new arrival next month.
This was a quick bath toy organization project. I added some ribbons to the sides of a large mesh laundry bag and hung it from suction cups. I almost bought a special bath toy organization bag but decided to save some money. (This solution only cost about $4.)

This was a quick bath toy organization project. I added some ribbons to the sides of a large mesh laundry bag and hung it from suction cups. I almost bought a special bath toy organization bag but decided to save some money. (This solution only cost about $4.)

Monday, July 29, 2013
DIY Reusable Labels

So. I’m nesting. A little bit. (It’s still early.)
And I’m on a bit of an organization and labeling craze.
Thursday, July 25, 2013
Baking & Organizing
As we get closer to the arrival of child #3 (2 months to go!), we’ve made some changes to our boys’ sleeping arrangements. We put them both in one room. Things have been a little rough. For me. They don’t seem to mind being up til we go to bed or up at 5:45 am when my husband wakes up to run. But I mind it.
Anyway, I’ve had a few grumpy mornings. But what have I been doing? Cooking. Organizing. And today, I baked. I had pinned this recipe a few months ago. Before blueberries were in season. And then I never had time to make it. Until today.
")
Anyway, I’ve had a few grumpy mornings. But what have I been doing? Cooking. Organizing. And today, I baked. I had pinned this recipe a few months ago. Before blueberries were in season. And then I never had time to make it. Until today.
")
Friday, December 14, 2012
Upcycled Corbel Shelf
I wanted a shelf for school supplies in our study room. If you recall, I painted a chalkboard-topped desk a few months ago for this same room.
I wanted a shelf to keep certain items out of the little hands of two little boys. I was able to upcycle the corbels I used for this shelf from the old farmhouse that used to sit on our property. Quick explanation of the old farmhouse can be found here.

Thursday, September 13, 2012
Kitchen Desk/Command Center

When we moved into our home, I wanted a desk in the kitchen. My wonderful husband and father decided to make the desk themselves. My husband also restored the white cabinets from the house that was torn down to build our new home. (Read more of that story here.)
Tuesday, September 4, 2012
Glass Dry-Erase To-Do List.
For my birthday (which was in January!), my dad made me this big picture frame. I had asked for something this size to use as a dry erase board in our kitchen. (Glass can be used as a dry-erase board.) I wanted to have a giant to-do list but wanted something more decorative than a plain white dry erase board. I had envisioned organizing it with different grocery store lists, a to-clean list, etc.
However, I couldn’t decide what to put behind the glass. This is what I’ve finally settled upon.

Thursday, June 14, 2012
Staying Organized: Pantry
Just a quick little idea for you organizing fanatics out there.
Do you have a bunch of plastic magazine holders? Someone gave me about eight of them and I wasn’t sure what to do with them at first. Then I decided to turn them onto their sides to create mini shelves in my pantry. This allows me to have a place to store recipes torn from magazines, coupons, and other random collections.

Also, I turned some onto their sides to store tubes of tin foil, saran wrap, and other kitchen items that come on a roll. They also contain stuff like bubble wrap or plastic bags I want to re-use.

Wednesday, June 13, 2012

Tuesday, June 12, 2012
Organizing Kids’ Dishes
A friend of mine was visiting and commented that she liked the set up we have to encourage our toddler to help out.

In our kitchen, we have a low cupboard devoted to our little guys’ plates, dishes, cups, and flatware. My three year-old can help by putting away his own dishes as I empty the dishwasher. He can also be helpful when it is time to eat by finding the appropriate dish or utensil.

In our kitchen, we have a low cupboard devoted to our little guys’ plates, dishes, cups, and flatware. My three year-old can help by putting away his own dishes as I empty the dishwasher. He can also be helpful when it is time to eat by finding the appropriate dish or utensil.
Friday, April 6, 2012
Craft Storage Shelf from a Drawer

I needed a shelf for my craft supplies. Want to see how I turned an old drawer into a shelf?
Tuesday, February 21, 2012
Displaying & Organizing Greeting Cards
I love getting cards in the mail. However, they can be a disaster to display if you have too many. A display dilemma we experienced this year at Christmas was that many of then cards we received were picture cards that didn’t stand up.
This was my solution: 

After a holiday/birthday is over, what do you do with your cards? I used to put them into a shoebox. But this year, I decided to punch holes into all our cards and make a book. 

My son especially loves looking at Elmo.

Wednesday, February 1, 2012
Freezer Paper Stenciled T-Shirt Sleeve Pouches with PLAID Paints

**Regarding the original tutorial to make the pouches, I thought of a time-saving tip. When making the drawstring, use t-shirt yarn (tutorial to make your own here) instead of sewing tubes of scraps and then turning them.**

Anyway, to do the stenciling, assemble your freezer paper stenciling supplies. You do not need to use 'special' fabric paint. I used PLAID acrylic paint and it works fine for fabric.

My tutorial for freezer paper stenciling is found here.
I used small paper punches to make my stencils (a butterfly and a star).
I laid out my scraps and waited for the stencils to dry before sewing everything together.


The very last step is to use a hot iron to set the paint. That way if you need to wash the pouch, the paint won't run.
I really love how they turned out. They are super easy and practically free to make! They make great storage for the zillions of tiny pieces that come with toys.


Thursday, January 19, 2012
Rustic DIY Coat Rack
When my husband and I got married seven and a half years ago, we registered for wedding gifts. As we were about to get the scanner from the sales woman, she happened to ask what our home’s theme would be. Before I could open my mouth to answer, my husband responded enthusiastically, “Rustic.”
???
That answer was not quite what I had in mind at the time! However, as time passes, our home is slowly taking on this theme. This coat rack is an example of the “rusticness” creeping into our decor.

My husband took a rough cut piece of lumber from my dad’s shop and we put some English oil and shellac on it. I picked out some hooks from Lowe’s. For $9, we have a great looking solution for organizing purses, coats & hats in the mudroom.

I love it. My husband is so clever.

And after seven and a half years of marriage, he's got me sold on the rustic theme.

(Why are husbands even more attractive while holding a baby?)
Wednesday, January 11, 2012
Dry Erase Calendar: Finished!
Before we start, can I just say it is super hard to take a good picture of something with glass in it?
This is the best I could do!
I was so excited to finally finish my calendar!
Briefly, all I did was measure the width and divide by 7. I cut out 35 pieces of scrabook paper. Then I used a glue stick to glue them to a big piece of brown paper (it was a middle of a wrapping paper roll). Then I put them behind a big piece of glass my husband got for me from Lowe’s. It can be written on with a dry erase marker!
Tuesday, January 10, 2012
Tutorial: Repurposed T-Shirt Bag with Iron-on Animals
 My kids got tons of toys for Christmas. Way too many. It drives me insane when they all end up in one big jumble…I like to group like toys together. I made a few repurposed bags last summer (small ones from t-shirt sleeves and large ones from t-shirts).
I used an old t-shirt that had some oil stains on it that I couldn’t remove. It was size 2T.

I just cut it off below the armpits. (I saved the sleeves & neck for another project!)

Next, it was time to do some embellishing. I used heat-n-bond to attach an elephant and a hippo to a scrap of white jersey fabric. 

Ironing on the hippo:


To make the bottom of the bag, I measured the perimeter of the t-shirt. Then I cut out a rectangle.

I sewed the rectangle to the bottom of the bag, making square corners.

I used the original hem of the t-shirt for the drawstring’s casing. I just pulled out a few stitches and then backstitched with my sewing machine to prevent any more from unraveling.

I made the drawstring out of jersey fabric. I cut a length about 2” wide long enough to go all through the t-shirt’s hem. I sewed a tube and then turned it right-side out with a safety pin.

Then I simply threaded it through the hem with the safety pin and tied a knot at either end! Simple, yet very cute!
Thursday, September 15, 2011
Repurposed Craft Supply Wall Organizer
I found this item in my parents' barn. My dad said I could do whatever I wanted to it.
"What is it?"
 My dad explained it was a radiator cover that was in my great-aunt's apartment. She passed away approximately 25 years ago, so I have no idea why anyone saved this custom-designed radiator cover for an apartment in which she no longer lives.
Whatever the case, I saw great potential for repurposing it into the craft storage unit I've always wanted.
To start things off, I took a tiger saw and removed the grate from the front. Then I
sanded (a lot) to get the peeling paint off.
This was before my dad mentioned that it was probably lead paint and I should be careful of the dust and fumes.
Here is a picture of the whole thing clamped on its side post-tiger sawing:

My dad helped me cut some cleats and dowel rods (the cleats are “u-shaped” and hold the dowel rods up) to use for ribbon and paper storage. I attached them with Gorilla Glue and some screws.
I later coated it with antique white glossy spray paint. Then I masked the sides, top and bottom of the shelves, like I did for the bookshelf, and sprayed the back of the shelves with flat lilac spray paint.
Here is the finished product!
http://roadkillrescue.net/"> src="http://roadkillrescue.net/buttonImages/Rescuer.png" target="_blank"/>
Tuesday, August 23, 2011
A Sad State...
This is the current state of my crafting and sewing stuff. Since moving, I haven't gotten organized yet. I can't even see my sewing machine amid the chaos.
When I finally get organized, I'll show off my newest repurposed creation for organization.
When I finally get organized, I'll show off my newest repurposed creation for organization.

Tuesday, May 3, 2011
Painted Scrap Bins
I was storing my scraps in ordinary shoeboxes. That isn't very fun. Then I remembered my love for spray paint. These baskets were plastic (bright green, from my mom's cast-off spring cleaning/organizing), so I started with a coat of plastic spray paint. It was white. Then I added a coat of lilac non-plastic spray paint.

This was after one application. I was at the end of a can of paint and so it turned a little splotchy (on the inside). I had to sand out some runs and then recoat the whole thing.
That's what happens when you paint outside at night without enough light...you fix your mistakes the next day.

This isn't even all my scraps. I could've used 2 more of these baskets to contain everything.

Friday, April 29, 2011
Making Garbage Pretty
In our new house, I am anticipating having a crafting 'studio'. It'll be more like a crafting area in our master bedroom, but studio sounds a lot more fancy! I've been making plans for storage solutions that are aesthetically pleasing yet frugal.
I've also fallen in love with spray paint--remember this project? (Don't worry, I'm pregnant, so I only use the paint outside in between the tremendous April rainstorms.)
We have a lot of empty yogurt containers around the house. I wanted to make them look nice. I bought more of the lilac spray paint I used for the recipe box project--I found it was clearanced for $1.88/can, so I bought two cans--and decided to go to town spraying down some garbage.

I set the containers up on scraps of wood so that I could just do one application and sprayed them with the lids on.
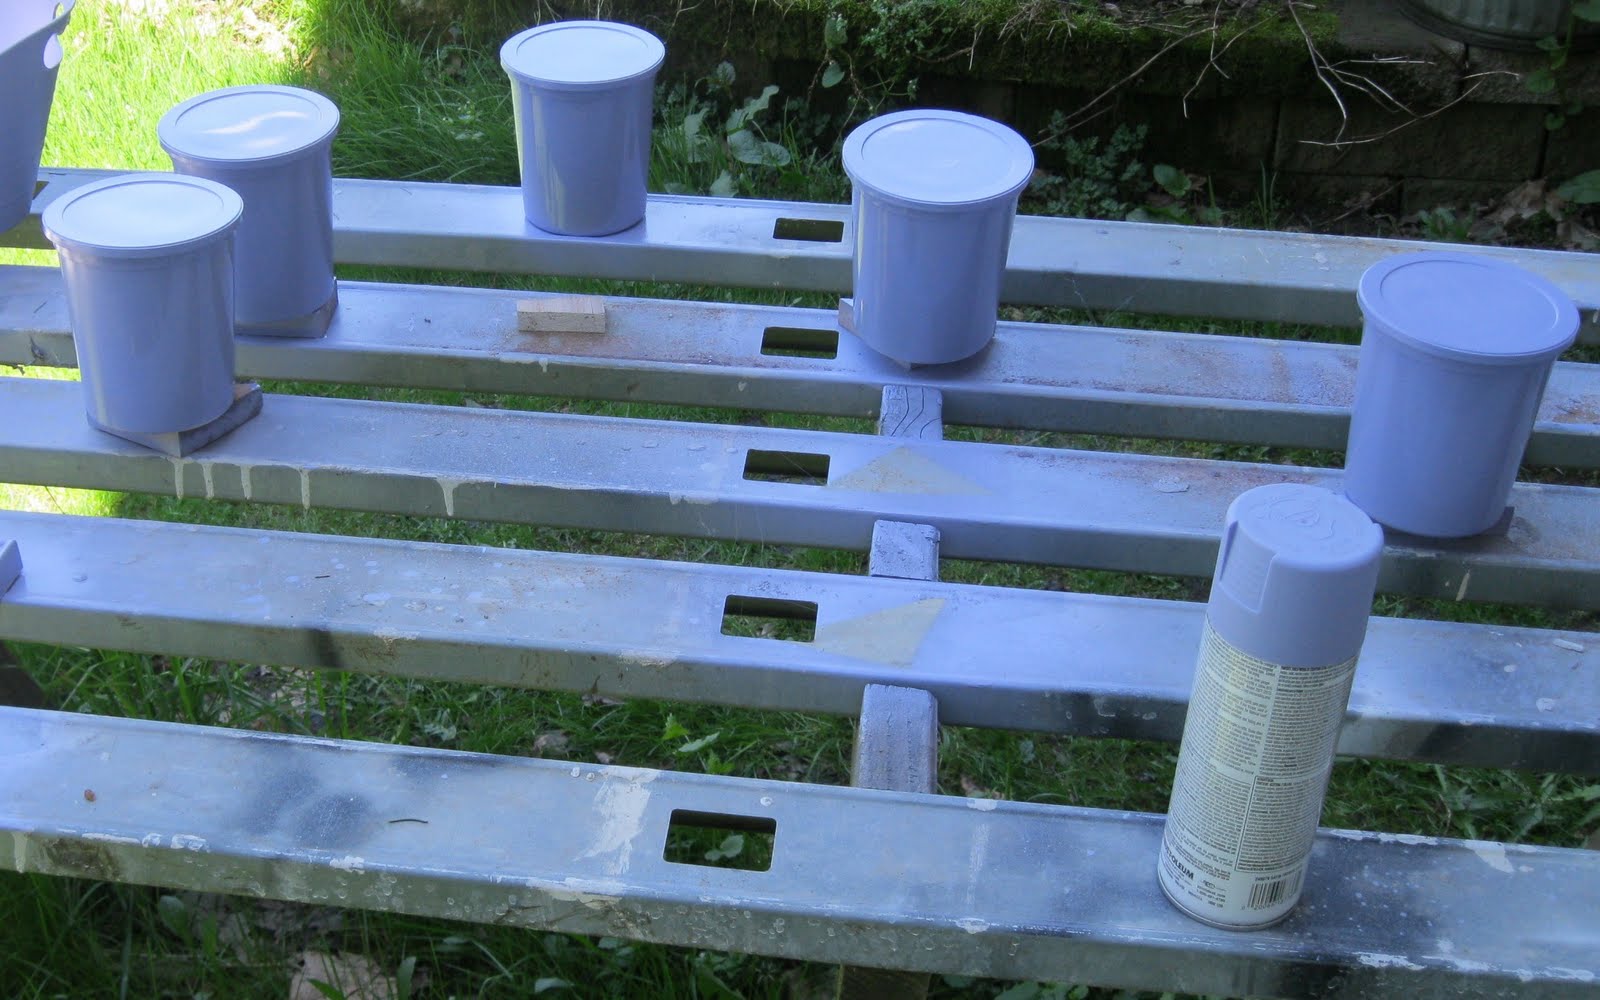
Here's how they turned out! I love them and have already filled them with various things like elastic, ribbon scraps, paper scraps, embroidery floss, velcro...the list goes on.


I'll be painting some other things with the paint, too.
I have a vintage project I actually finished a few months ago but am waiting for my dad to build the final part...but I'll be sharing it soon. (He points out that since I have no house to put this large vintage item that there isn't a rush...and he's right.)
Subscribe to:
Posts (Atom)


