Hello Monkey See, Monkey Do readers!!! I am soooo happy to be here!!
My name is Michelle and my blog is called Delicate Construction! I am a wife, mommy, full time caregiver and teacher living in San Diego, California. I blog about crafts, family, decorating, and kids activities in various features and linky parties; Made by Little Hands Mondays for the kiddies and Delicately Constructed Fridays for the Mamas! I also love to share tips in one of my favorite weekly posts; 10 New Uses Tuesdays! I would love to have you come visit!! I am also always looking for guest bloggers for my Sunday feature and interviewees for my Seven on Saturdays!
But back to the crafting, it is why we all gathered here right?!
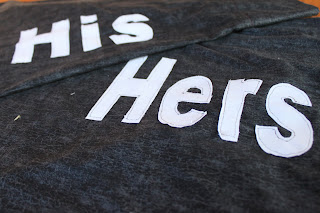
I am going to share a tutorial for my 'his' and 'hers' pillow cases I made as a kind of cheeky little joke...cause I am like that.
Cute right?! It is funny because of the drastic differences in my husband and my pillows... can you tell now?
Do you see it?! My husband is a self proclaimed pillow SNOB. LOL. He likes the
(did I mention sarcasm is my second language, even in sewing, because it is...just sayin' lol)
And here is how I did it:
Materials:
- Pillowcase (I made mine using this tutorial from Made)
- Letters (any template you have, I made mine from word art in Microsoft Word)
- Steam a Seam or other fusible webbing or iron on seam
- Scissors
- Sewing machine
- Iron
- Pen
Here is the starting pillowcase I made, you will want to take into consideration which way you like the openings, we put them both facing out, some do it facing the same way. It matters when you go to add the letters and which direction they are sewn on.
Cut out your letters or use a pre-made template, in Microsoft Word there is word art that is just outlined block letters and I typed in my words, enlarged them and printed them out.
Next, (this is dependent on what you use, I am following my package directions for the next couple of steps) trace your letters on the steam a seam BACKWARDS, also make sure this is the side that webbing is connected to on the underside.
Since mine fit on one page, I then cut them apart.
Next, lay out your white fabric (or whatever you are using for the letters) FACE DOWN and iron it to warm it up.
Then, peel off the underside of the paper and lay the webbing/ second paper that you traced on, on top of the fabric.
Then, carefully cut out your letters once again with the fabric.
Now, you are ready to iron them on but I found it difficult to eyeball it with the pillow case laid out flat so I turned it over and folded each edge to the center, kind of like bias tape.
Then, flip it over, this was much easier for me to eyeball the center for the placement of my letters.
Then, arrange them how you want,
and iron them down in place.
Last, all you have to do is sew very close to the edge as best you can, just to make sure everything stays in place.
Now, they are all ready for a laugh!
I will do a lot to make that hubby of mine chuckle.
Thanks Jennifer, so much for having me today!! I really appreciate it!! I hope to see all of you over at my little corner of the internet soon!!


Really cute! Love this idea!
ReplyDeleteSuch a great idea! My husband always tries to steal my pillow. :) Thanks for sharing Michelle!
ReplyDeleteOMG!! AGAIN! My husband is a pillow snob too!! He even named his pillow (as a joke...but sometimes Im not so sure...)!!! I know! This is too funny and would make such a great Christmas gift...Im sick right? Already thinking about Christmas..
ReplyDeleteLove it Michelle!
These are so cute (and practical). I also have a pillow sneak of a hubby. I actually switch pillows when making the bed, so he THINKS he's stealing mine! :)
ReplyDeleteGreat job!
Amy