Pages

Thursday, June 30, 2011

Guest Post from Abby of GouldThreads


This post is from my friend Abby! She has a great tutorial to share with you today on making crocheted flowers. I love that you can use yarn scraps for her project! Make sure you check out her Etsy shop and Facebook sites. Not only is she fantastic, she has such cute pictures of babies & kids modeling her creations!

Hello! I'm Abby Gouldsbarry from GouldThreads. I'm thrilled to be a guest on Monkey See Monkey Do! Today I'm going to show you how to create adorable crocheted flowers. They are so cute and easy to make. I use mine to make girls hair clips but you can use them for homemade bookmarks, appliqués, decorations--you name it!

I first began crocheting in college with some friends and later taught myself how to knit as well. This winter I opened my Etsy shop and began to sell some of my creations. Some of the items that you will find in my shop include hats, accessories for boys and girls, and newborn photo props. I also take custom orders. I just LOVE making new items and always aim to please! You can find me on Facebook by searching for GouldThreads or visit my Etsy site at

Happy crocheting!!!

One of the great things about these flowers is that you can use just about any yarn and any size hook. You can use 1 color or 2. I am using 2 for this tutorial (MC-Yellow, CC-Pink). The MC will be for the center of the flower and the CC for the petals. For this tutorial I am using Red Heart Super Saver size 4 yarns and a G hook (4.25 mm). Bonus: This is a great way to use up some of your yarn scraps!

To make a flower of your own: Using MC (yellow in my picture) Chain 2. 5 SC into the 2nd chain from hook. SL ST to first SC. Switch to CC (pink in my pictures) and pull up a loop (see picture above).

Here is what it will look like once you have your CC on the hook. Notice how you have 4 tails hanging (2 MC and 2 CC). I like to pull the tail of the MC tight to secure the CC. Once the CC is secure you can cut the MC from its ball leaving a 1 or 2 inch tail hanging.


With CC, *SL ST to next stitch. Chain 2. 2 DC in same stitch (I DC over the tail of MC that I just cut and the CC). SL ST again in same stitch. It should look like the above picture.
Repeat from *4 times for a total of 5 petals.


SL ST to bottom of first petal. Fasten off and weave in loose ends. TA-DA! That's it. What a simple and sweet little flower.


I like to use my flowers to make hair clips like the ones sold here on my Etsy site.

Here is a bookmark that I made using a crocheted flower and heavy cardstock! I just used a glue gun to adhere the flower to the cardstock. What a simple and unique gift!

Thanks for reading and trying out my tutorial!
Please remember to check out my sites on Facebook and Etsy!

Tuesday, June 28, 2011

Newborn Hats

I made a few more newborn hats this week. I'm in full nesting mode (only 2.5 weeks left til my due date!); at least as much as I can be since I don't have my own house
(5 weeks til our projected move-in date!)
I made these hats using the tutorial and pattern I posted here.

Something really exciting is that a friend of the family is working with a church group to make hats and blankets for the local hospital (the same hospital where I'll be having the baby!) She said that some of the moms have nothing for the baby and the hospital staff has to scramble to find a blanket for them to take home. So my friend is going to use my pattern to turn t-shirts into hats for these underprivileged babies.

I'm thinking that I'll take my extra newborn hats in my hospital bag and leave them with the nursing staff to give to moms in need. My baby can only wear a few...it IS July, after all!

Monday, June 27, 2011

Yellow and Gray Zippered Ruffle Pouch

I love the color combo yellow and gray. You may be seeing more of it from me.

I made this pouch using the same procedure I did for the tutorial found here. The only difference is that this pouch is 5" x 7". I made it to protect my itouch.

Part of it is even repurposed: I used a zipper from a pair of pants I ripped apart to make

Thursday, June 23, 2011

Gathered Tunic Shirt

Talk about a super easy frugal, repurposed tunic! You've got to try making yourself one of these.

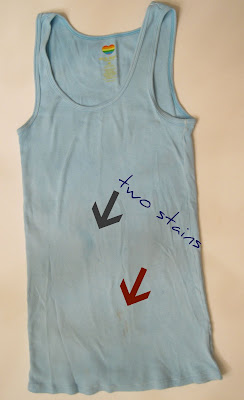
I started this project because I had this tank top with two stains on it.
No idea how they got there.
I love the color, so I wasn't ready to say 'bye-bye' to the shirt itself.

I got this shirt below practically free from a church rummage sale. It's brand new; it has 'sample' written on the inside in permanent marker.

The shirt was too small for me to wear (I am really tall, and it's a size small!) but it was perfect for my project.

Not sure how to obtain more sample clothing. Ideas? What do stores do with their samples?


I cut off the blue shirt below the bust as I wanted to create a tunic with an empire waist.
I have another shirt with the same type of style, so I measured it and found it was 12" from the shoulder to the waist.

I added an extra 3/4'' for seam allowance to the length before cutting.

I took the second shirt and cut it right underneath the armpits. I wanted the waist of the tunic to be as long as possible.
The yellow shirt had a greater diameter than the blue one. I gathered the front and back of the yellow shirt until it met up with the blue shirt's diameter.
Gathering just the front and back (not the sides) gives a more slimming effect.

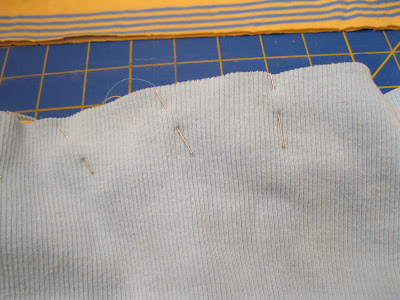
I pinned the tunic pieces into place with right sides together.


After sewing the seam, I turned the shirt right sides out and removed the basting stitches I had used for gathering the front and back.

Press the seam with a steam iron.
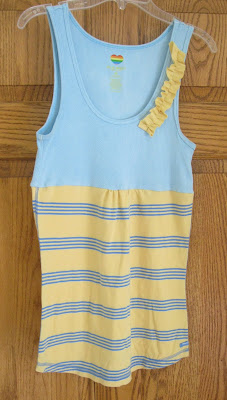
I could have stopped right there, but I couldn't resist adding some sort of an embellishment to the upper part of the shirt.

I decided to add a little ruffle. I just gathered a strip of the solid yellow fabric with my sewing machine...

...pinned it into place...and then sewed it down. Then I removed the basting stitches I had used for gathering the ruffle.
All done! I can't model it yet because I'm still nine months pregnant. I'm looking forward to wearing it this summer after the baby arrives!
You could easily make this a maternity style shirt, too. You'd need to start with a shirt larger than a size small for the bottom half and probably do some heavier gathering than I used for this one (you might have to gather the sides!) Alternatively, you could probably pleat the front and leave plenty of room for a pregnant tummy.

Wednesday, June 22, 2011

Handmade Thank You Cards

My son got some great gifts for his birthday.
Did you see my post about his birthday decorations here?

I obviously wanted and needed to write some thank-you notes, but I didn't have any cards that were suitable for a little boy to send.


That just shows how many thoughtful gifts this kid has gotten over his two-year life span...I went through all the boy cards in my stash!


After surveying the grocery store's selection a few days ago, I decided to just make some. I had all the supplies...I busted out my scrapbook paper, paper cutter, some ribbon scraps, and a new stamp I got for $1 at Target. They didn't match his birthday party's theme, but I couldn't bear to cut out any more cars after last week!


Tuesday, June 21, 2011

Ruffle T-Shirt Skirt

In case you missed my guest post at Couturier Mommy last Thursday, here is a repeat of it.

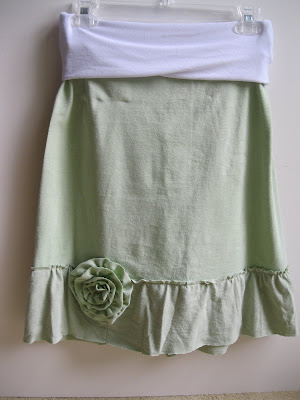
I made this skirt out of two t-shirts. They were both a pale green color--not my favorite but this was an experiment that turned out well. I used a piece of stretch jersey (5% spandex) for the waistband.
T-Shirt Ruffle Skirt #ruffleskirt #t-shirtskirtwithruffle

skirt made from t-shirts


I used these two shirts. The second one is my Cleveland Half Marathon shirt. I was sad to cut it up but it had some fading by the neck, so I decided to give in and cut it because it matched this one:


I took a picture of it for nostalgia's sake. I can move on now!


First, I cut the fabric for the ruffle. I made my ruffle 4" wide and without any hemming on either side. I don't really love hemming, and jersey fabric won't fray!


I cut the skirt from the larger of the two shirts. The waist is large enough to fit around the largest part of my hips with an extra inch for seam allowance. I left the hem of the shirt on the bottom of the skirt. The ruffle will cover it up. I made the skirt A-line by just eyeing it up and cutting a straight line down the edges.


Next, I attached the ruffle around the bottom of the skirt. I pinned it over the hem of the t-shirt.


This picture shows how I tried to 'just cover' the hem so the skirt would be as long as possible (I'm a tall girl!)

To make the flower, I took strips of 1.5" wide t-shirt fabric, gathered it, and then cut a circle the diameter that I wanted the flower embellishment to be. I pinned the first row of ruffle around the edge of the circle.


I started sewing that row and kept sewing in a circle (without pinning). I tried to keep each subsequent row of ruffles close enough to cover the last row's stitching, if that makes sense.


There's the finished flower! I attached it to cover the seam of the ruffle (which ended up in the front and off to the side a bit).


The next step is to make the waistband. I made it a lot tighter than I thought I'd need it (this was an experiment...) but it worked really well. I usually make my yoga skirts to fit my waist minus 3". This time, I made it minus 6" and it is very comfortable, yet secure.

Cut two pieces of your waist's fabric to be 14" tall and then your waist measurement minus 6" (x-6).


Sew up the 14" sides with right sides together using a stretch stitch. Fold the waistband over with wrong sides together.


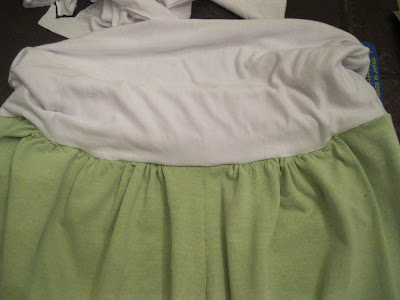
This next part may be a bit unconventional, but I wanted to only gather the back of the skirt, leaving the front part flat. I gathered the back part just enough so that the fabric diameter of the skirt's waist matched that of the waistband.


Then, I pinned the waistband in place (right sides together).


I used a stretch stitch to attach the waistband to the skirt. This is the outside view.


A stem iron will help to rid the skirt's waistband of wrinkles.


Here's a picture of the finished skirt from the back (waist is folded over).


Here is the front view. I like how the flat front looks.


It's been so fun for me to experiment with 'found' fabrics like "upcycled" t-shirts and other clothing.


Thursday, June 16, 2011

Bathing Suit Cover-Up Tutorial

It's been hot! I have been taking my son to the pool a few times per week. I need some sort of a bathing suit cover-up. However, after I got halfway done with this one, I was discouraged to note it was not going to be flattering on an almost-9-months-pregnant woman.
I will be saving it for when I'm done with this pregnancy in about 4 weeks!

...and after I lose the baby weight and feel like putting on a bathing suit...which could be next summer...

I used three t-shirts to make this cover-up. I determined how much fabric I could use from each shirt (I cut around any printing on the t-shirt to just use plain fabric) and planned a finished length of 35". That meant seven 5" strips. I made the strips 44" wide which was the full width of the t-shirts.

Note: I cut the white strips 6" tall to allow for seam allowance after assembling the strips. I also made sure to use the hem of the shirt at the bottom of the cover-up so I wouldn't have to do my own hem.

After sewing all the strips together and then sewing the assembled strips into a tube, I folded the top strip down about 1/2" and pinned it into place. Then I pressed it.
This will be the elastic casing.

I sewed around the whole top of the pressed-down piece but left a tiny opening.

I cut a strip of 1/4" wide elastic long enough to securely gather the fabric just below armpit level. I inserted my elastic into the casing and ran it through using a safety pin.

I securely stitched the ends of the elastic together.
Then, I sewed the casing shut the rest of the way.

I determined the straps needed to be approximately 18" long. I wanted the straps to be 2" wide in their finished form. I sewed two tubes and then turned and pressed them flat. To attach the straps, I tried on the whole cover-up to determine where to place them. Then I stitched them into place.

Somewhere along the line, I made a belt (I forgot to take pictures). I used leftover fabric from two of the shirts, stitched it together, turned it, pressed it, and sewed the open end together. It's about 3" wide and 44" long.

I made the belt loops 2" x 4". I sewed them together, clipped the corners, turned them, and pressed them flat.

I sort of had to guess where to attach them, but ideally, I would have measured where I wanted the belt to hit. Since my waist feels it is 100x its normal size right now, I just guessed!

Another free project! I love using old t-shirts to make new things. These shirts were such great colors, too.

I can't wait to get my 'regular' figure back so I can try it on. I have found that horizontal stripes are not the most flattering on my pregnant frame.
If you wanted to make this for a toddler or small child, you could just use one t-shirt, not strips. That would allow you to skip the first few steps.