
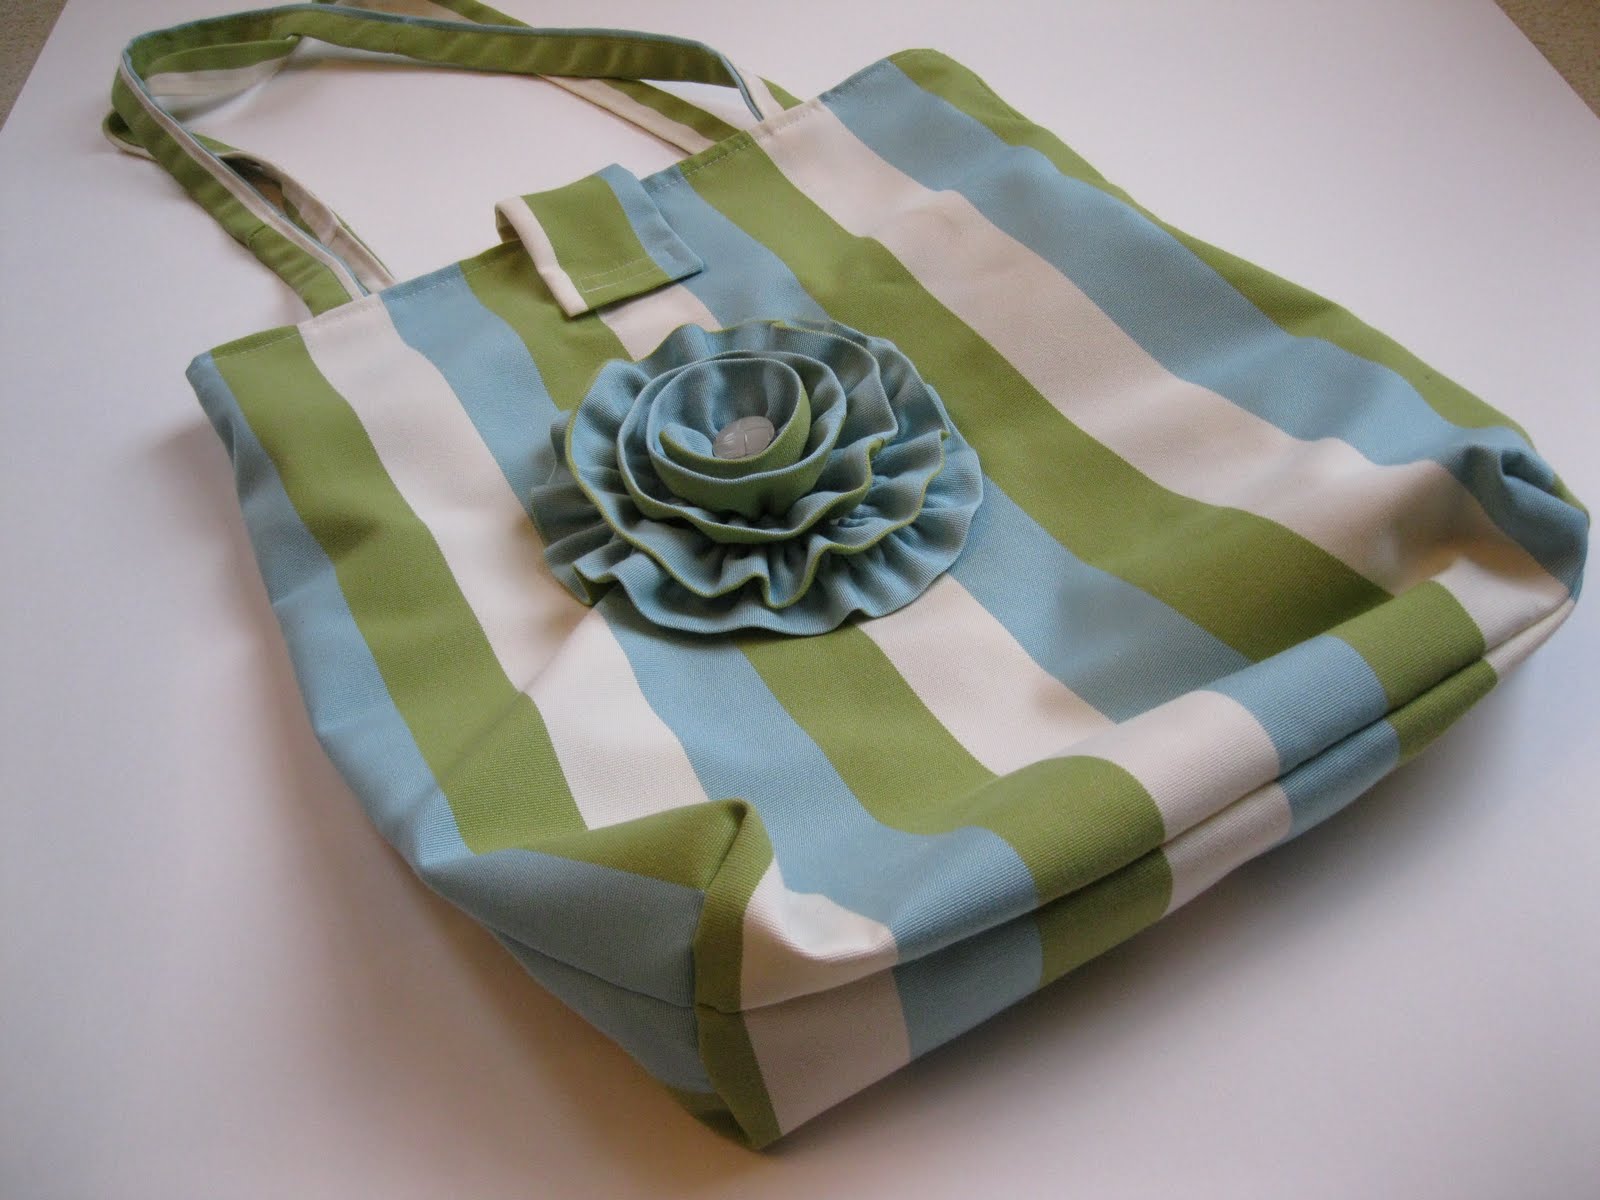
For my newest creation from my stash of green, blue and white striped upholstery fabric, I made this tote bag with a giant flower on the front.
I am selling this bag in my Etsy shop, beadobsession!
*Note: I broke two regular sewing machine needles on this project. I found I needed to use a heavy duty needle to complete the flower portion of this bag.

I made the flower first. I took 4' of fabric that was about 2" wide and sewed it into a long tube. After turning the tube so right sides were out, I used a needle and thread to make large stitches and gather the fabric. (I tried to use my machine, but the thread kept breaking. So I did it the hard way and used stronger upholstery thread!)
Tuck the raw edges of the tube inside.

I cut out the lining and decided to add two large pockets. I divided each pocket into smaller pockets for a total of six pockets.

I hemmed around each pocket before sewing them into the bag. (Since the fabric is striped, I lined up the stripes so they matched.)

I cut my pieces 18" x 21". Cut two lining (seen below with pockets) and two outer fabric pieces.
I didn't show this with any pictures, but I made the handles each 33" long. To make them, I folded each piece in half and pressed it flat. Then, I unfolded it and folded each raw edge to the midline I had just created. Then I folded it again (to hide raw edges) and sewed a running stitch the length of each strap.

Sew the lining together on three edges with right sides together. Leave a space at the bottom large enough to insert your hand.

Fold the fabric at the bottom corners so your side and bottom seams run parallel to each other. Measure 2" from the tip and sew a straight line to create a gusset. Cut the triangular corner off. Repeat for the other side of the lining.
Don't sew the outer pieces together yet!

To sew the flower onto the front of the bag, determine the circumference of the largest portion of the flower by coiling your gathered fabric tube into a circle. Pin just the bottom row into place. Unravel the whole thing except the pinned bottom row. Sew the bottom row into place. (This is where I broke my regular needles and had to upgrade to heavy duty grade needles.)

Keep sewing the flower together like a spiral. I didn't take time to pin every row onto the fabric; I just kept sewing (slowly!)

Next problem: I got the whole thing stuck when I got to the middle; my sewing machine's foot didn't lift up enough to squeeze the flower out from underneath. My solution was to just remove the whole foot!

Remove the gathering stitches with your seam ripper. Be careful not to remove the stitches you just made to attach the flower to the fabric.

I added a vintage button to the middle of my flower. To attach the front and back of the bag together, repeat the steps taken to make the lining. Make gussets for the outside of the bag, too.

Make the closure piece for your bag. I used velcro; I've never worked with snaps but would like to sometime! My closure piece was about 2" wide and 5" long and I made it by sewing a tube, turning it and then pressing it flat. I added the velcro. Insert this piece so that it will face the front of the bag when you close it!

To assemble the bag, place the lining and outside of the bag with right sides together. Place the straps inside so that the strap ends will be caught in the seam. Also, place the closure piece so it is caught up in the same seam. Pin everything together.

See the raw ends of the straps?

After sewing the seam around the whole bag, insert your hand into the space at the bottom of the lining and turn the whole thing right sides out. Then add the second velcro piece to the bag's front. Press and then topstitch the bag's upper edge. Close the hole in the lining.

If you don't feel like making this bag, you can buy my version on etsy! I don't need another bag, so I'm selling it in my re-opened etsy shop, beadobsession. Check it out!
I think it would make a fun beach bag.


Really cute tutorial!! Looks super easy and fun!! I love fabric flowers!! They add pizzaz to any outfit/bag....etc!! Come follow me over on my blog. I'm following you too. http://DesignsByShauna.blogspot.com
ReplyDeletewhat a fun tote~love the colors!! thanks for the tutorial!
ReplyDeleteGorgeous bag, it makes me long for spring!
ReplyDeleteThere's a brilliant tutorial for using magnetic bag snaps on folksy, they're ever so easy!
http://www.folksy.com/makes/526-Fitting-a-Magnetic-Bag-Clasp
Awesome! I made a similar bag with a table runner a few months back, I love your though blossom!
ReplyDeleteThis is darling, I love it!
ReplyDeleteI LOVE this fabric! The bag is great!
ReplyDeleteI love this bag, especially the flower! I hope that you will link this up to my Show and Share linky party, going on all week. http://craftygeordi.blogspot.com/2011/02/show-and-share-sunday.html
ReplyDeleteBeautiful!!!! Wonderful job!!!
ReplyDeleteI am totally in love with that stripe and that adorable flower! LOve
ReplyDeleteChristine
greatoakcircle.com
Love it! I did a bag tutorial with striped fabric earlier this week, too. Lining up the pockets with the lining striping was such a pain, but I knew I'd go batty if they weren't lined up. Love the flower! Such a pretty feminine touch. Thanks for sharing.
ReplyDeleteI am loving projects with this color combination recently. The bag is really pretty!
ReplyDeleteSo cute!!!
ReplyDeleteThanks for all the comments! I appreciate it:) I tried to link up at the aforementioned link parties!
ReplyDeletehahaha, LOVE the name of your blog!!! Cute bag too.
ReplyDeleteXOXOXO,
Erika and Sebastian
www.sewdoggystyle.blogspot.com
Hi! Thanks for linking this on my Show and Share linky party. I have featured it on my Show and Share Showoffs, please come check it out and grab your bragging rights button. http://craftygeordi.blogspot.com/2011/02/show-and-share-showoffs-5.html
ReplyDeletep.s. I am following you now, looking forward to more
very cool. I love how the flower turned out. Come link up sometime at I Made It! Monday at Ninth Street Notions.
ReplyDeleteVERY sweet! I love the striped fabric!!
ReplyDeleteThanks for linking up to Making It With Allie! I can't wait to see what you have for next week!
AllieMakes.Blogspot.com
This is such a cute bag! We are featuring fabric over at the M&T Spotlight and would love for you to submit this: http://www.makeandtakes.com/spotlight
ReplyDeleteGreat tutorial! I'm new to making bags and love this!
ReplyDeleteI'm a new follower :)
www.youngnester.blogspot.com
mt linda aprendi bjs
ReplyDelete