-----------------------
Hi Monkey See Monkey Do fans, I'm Abby from GouldThreads. I blog about my crochet (and some knit) creations but also enjoy other crafts and DIY projects. Today I'm here to show you how to turn an old dresser into a new TV stand!
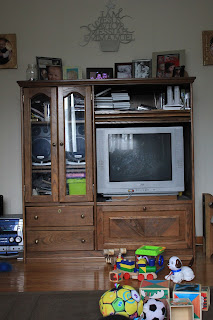
My husband and I were given this old entertainment stand for free about 6 1/2 years ago when we were first married.
Still not finding anything worth buying in stores I was thrilled when I came across this post on Pinterest showing how an old dresser was converted into a side table. I decided to use the same concept to make a new TV stand.
In an instant I thought of an old dresser that has been sitting in our basement for the past 4 years. The dresser was another freebie given to us by some family friends. We have never actually used it as a dresser so I knew this was the perfect solution to my entertainment stand problem!
We chose to paint it white to keep it neutral and removed the top drawer to make space for things like a DVD player and game system. We purchased 4 or 5 cans of "Rust-Oleum Painter's Touch Ultra Cover 2X Coverage" in white. We also purchased some new knobs to replace the old brass ones.
First we removed all the drawers and knobs. Next we used the spray paint to cover the entire dresser and the bottom two drawers. We decided to leave the top drawer out to leave space for our DVD player and other TV accessories.
Once we put our drawers back in place we noticed an unsightly gap that was visible when the top drawer was removed. Fortunately my father is a wood worker. He was able to add a piece of wood to cover the gap (see before and after photos below).
Before: unsightly gap at the top of the drawer
After: strip of wood has been added to the top of the drawer
After spraying the new strip of wood and adding the new knobs the dresser was almost completed.
Finally we drilled three holes through the back of the dresser where the top drawer used to sit. These holes allow easy access for our cords to be plugged into the wall behind the unit. Because the wood was very thin here we needed to put scrap wood behind the area we would be drilling to keep the wood from splintering. If we were do this project again I would have put the holes closer to the bottom of the open shelf to better hide the cords but overall I am really happy with our new TV stand!

It takes up a lot less space and has plenty of hidden storage space for movies and kids toys!
I believe the overall cost for the paint and the new knobs was about $30! If you don't have an extra dresser laying around your house like we did you could also search yard sales and estate sales for inexpensive dressers to repurpose for your own house!
Thanks for checking out my tutorial. Remember to swing by and find Gouldthreads on Facebook, Etsy, or check out the Gouldthreads blog!
----------------
Thanks, Abby! I love how your TV stand turned out! I think all that storage space is amazing and I love how affordable the project turned out to be.
Like furniture updates? Check out these from the Monkey See, Monkey Do archives:

Places I have linked:
Or So She Says, Train to Crazy, Tater tots & Jello, Merry Messy Life, Sugar Bee Crafts, Reasons to Skip the Housework, The 36th Avenue, House of Hepworths, Someday Crafts, Southern Lovely, 504 Main,Serenity Now, Fingerprints on the Fridge, I heart NapTime, Classy Clutter, A Glimpse Inside, Somewhat Simple, Gingerly Made, Serenity Now, Today's Creative Blog, The Winthrop Chronicles, Home Stories A to Z, CraftyScrappyHappy


The TV stand dresser turned out lovely and functional. I'd love if you'd come share at Inspire Us Thursday http://organized31.blogspot.com/2013/06/inspire-us-thursday-link-party-2.html
ReplyDeleteThis is a very interesting post. Thank you for posting a lot of interesting posts.
ReplyDeleteNice! Your article is extremely attractive and interesting, I need to to thank you for this great read!
ReplyDelete