Pages

Friday, April 29, 2011

Making Garbage Pretty

In our new house, I am anticipating having a crafting 'studio'. It'll be more like a crafting area in our master bedroom, but studio sounds a lot more fancy! I've been making plans for storage solutions that are aesthetically pleasing yet frugal.

I've also fallen in love with spray paint--remember this project? (Don't worry, I'm pregnant, so I only use the paint outside in between the tremendous April rainstorms.)

We have a lot of empty yogurt containers around the house. I wanted to make them look nice. I bought more of the lilac spray paint I used for the recipe box project--I found it was clearanced for $1.88/can, so I bought two cans--and decided to go to town spraying down some garbage.

I set the containers up on scraps of wood so that I could just do one application and sprayed them with the lids on.

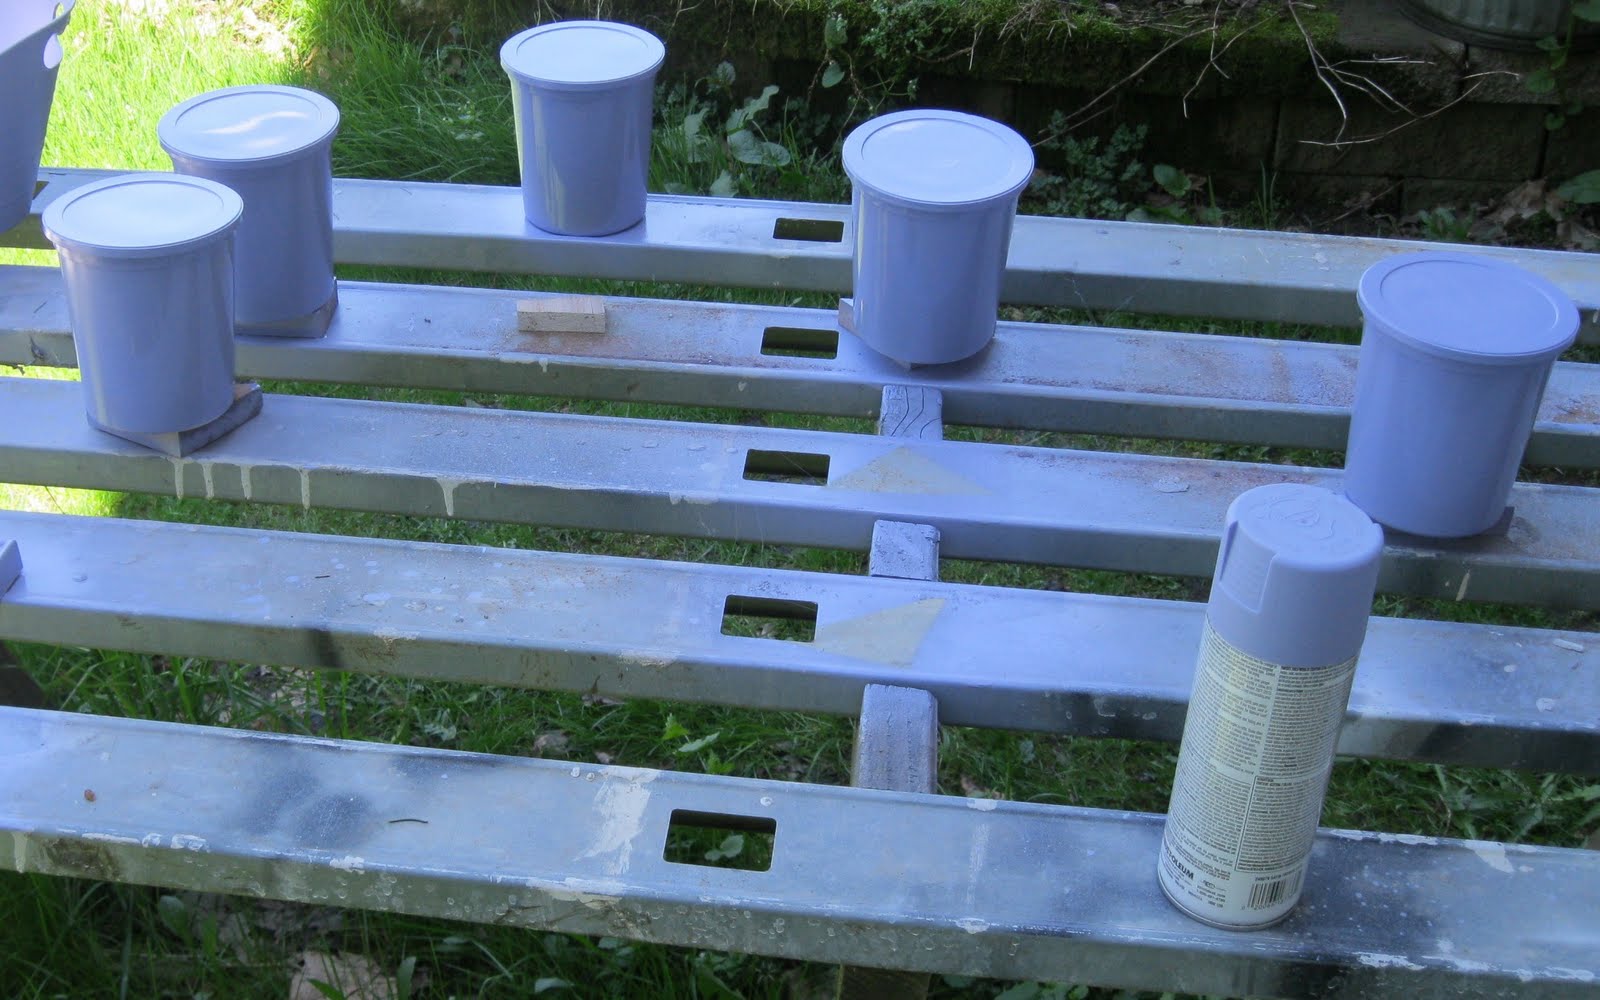
Here's how they turned out! I love them and have already filled them with various things like elastic, ribbon scraps, paper scraps, embroidery floss, velcro...the list goes on.

I'll be painting some other things with the paint, too.
I have a vintage project I actually finished a few months ago but am waiting for my dad to build the final part...but I'll be sharing it soon. (He points out that since I have no house to put this large vintage item that there isn't a rush...and he's right.)

Thursday, April 28, 2011

Maternity Skirt from Men's Pants

Obviously, I'm on a maternity clothing kick. I took a pair of men's pants and used the same tutorial I did here to make this skirt.

This is the finished maternity skirt:

An interesting source for fabric...a pair of men's pants. Inexpensive men's pants, straight from Old Navy's clearance section. I was there to look for inexpensive knits to repurpose into a skirt for me...but I came home with these. They weren't even $0.47, as the sticker says. They were half off, so only $0.23!!

They were a pair of very large men's pants. (I didn't know about men's sizing until I got married, but 48" is the waist size. 30" is the inseam.) My tall, slim, yet muscular husband wears a 34" x 34" to put the size of these 48" x 30" pants into perspective for you.

I cut off the bottom part of the legs. The goal is to use the pant's hem for the hem of the skirt. I made sure to cut enough off so the skirt would be long enough for me plus an extra inch for seam allowance. Then I cut the legs in half and cut off one of the side seams.
After that, I made the waistband the same way I made the waistband for the flat-front yoga skirt here. That means I had to stretch it to fit the skirt's waist as I didn't want to gather the skirt (for more of a pencil-shaped look). You could really use any fabric source for the skirt and then use a nice, stretchy jersey for the waistband!

Tuesday, April 26, 2011

Maternity Capris Refashioned from Too-Large Maternity Pants

I made a pair of capris out of a too-large and too-short pair of maternity pants.

A picture of the waist:
I used the same method found here and here that I used to make my maternity shorts.

Monday, April 25, 2011

Zipper Pouch with Ruffle Tutorial

This is my first attempt at sewing a zipper into a project! It turned out really well. It's much easier to make a pouch with a zipper than I'd ever imagined. Follow along for a tutorial!


Here's an inside view:

I added a three-tiered ruffle to the front of my zipper pouch. I started with three different width strips of fabric of the same length (11" long).

I sewed each one with right sides together into a tube, then turned them right sides out, and then pressed them all flat.

Next, I stacked the strips with the narrowest on top.
I used a wide stitch to sew them together and then gathered them into a ruffle.

I used a 7" zipper for this project and cut the outer and lining pieces so that they were also 7" in width and 6" in height. I used one long piece for the outer fabric so it wouldn't have a bottom seam.

To attach the ruffle, place it in the center of the fabric that will be the front of the pouch, pin it down, and then sew it using a running stitch. You can remove the gathering stitches after you sew it in place.

Add any other embellishments to the outer part of the pouch at this point. I added a fabric flower with a button in the middle which I made using the tutorial found here.

To start sewing the pouch together, take the lining fabric and place it right side up. Then line up the edge of the zipper right side up and last of all place the outer fabric right side down on top of that. Line up the edges and pin into place.
After you stitch it into place using a zipper presser foot for your sewing machine, open the zipper slightly.
Next, place the other half of the zipper between the lining and outer fabric's right sides, line it all up and pin into place.

Now you're ready to sew around the perimeter. Pin it all into place and leave a space for turning in the lining.

Clip any excess ruffle from the front. Clip the corners of the lining and outer fabric.

Now turn the whole thing through the hole you left in the lining. Push the corners out so they are nice and crisp. Sew the hole in the lining closed.

Admire your new pouch!

Thursday, April 21, 2011

Last Minute Easter Gift Tutorial

We're leaving today to drive from PA to Vermont to visit my husband's BFF & family for the weekend...so the last thing I have time to do today is sewing or crafts.

So I just made this (it's still wet, I was in a hurry to post this brief tutorial!):
I was doing some Easter basket shopping for our little boy (even though we're not big on the Easter Bunny) and got him a little 5 1/2" x 3 1/2" notebook at the dollar store. It was plain on the front and I decided it needed something cute. I wanted to add some
fabric.

Ideally I would've used fabric with a smaller print, but this was short notice crafting!

This is what you'll need:

1. Paint the modge podge onto the notebook's cover making sure to get all the edges.

2. Carefully place the fabric on top, making sure there are no bumps. Wait 10 minutes.

3. Cover the top with more modge podge. Wait 10 minutes.
3. After the top layer is dry, add a monogram (mine is a sticker). Cover with modge podge.

This turned out really well and only cost $1, since I had the materials in my stash. I think these could be easily mass-produced for favors at wedding showers or other events.

Tuesday, April 19, 2011

More Taffeta Flower Headbands

I made a few more taffeta flower headbands using this tutorial. I had one friend tell me she liked my headband...she just had a baby, and I have a gift for the baby, but I thought I'd make her a headband as a mommy gift!

I had to make another pink one, too. It makes me think of spring!

Monday, April 18, 2011

Refashioning Pants into Maternity Shorts Part II

Are you still with me on the maternity shorts project? Hopefully you've gotten the pants you intend to repurpose all ripped apart and traced and cut a pattern of your existing shorts using my maternity shorts tutorial from yesterday.

Next, pin the pieces with right sides together, lining up the front and back crotches. You'll sew just the front and back crotch at this point. Do NOT sew down further than the curve:
maternity shorts tutorial

Here's the back crotch curve:


After you've gotten the front and back crotch pieces sewn together, open up the pants. You'll line up the leg inseams to prepare to sew those seams next.

At this point, I measured both the inseam and outseam of the original shorts to compare and make sure I was on target to have the hem straight across. I also tried them on to make sure they fit (they won't stay up yet, we haven't added the waistband).
Measuring the outseam:


For the waistband, you'll need some stretchy jersey fabric. Cut it so it is 14" high in the non-stretchy direction and then in the stretchy direction, cut it so that the diameter goes around your waist minus 4". I cut my stretchy fabric into 2 pieces.


Pin the 14" edges.


Sew the two pieces into a tube and then fold the tube in half with wrong sides together.

With the shorts inside out, insert the tube into the waistband of the shorts. The finished edge will be facing down.

Pin the tube in place. Note that prior to pinning, fold the tube into quarters and mark the middle of the front and back. You'll want to match the side seams up with the short's side seams and the middle of the front and back up with the short's front and back middle seams. You will likely have to stretch the tube between these points. Use a stretch stitch and a jersey needle.

Zig zag the raw edges (I feel this is optional...)

You're going to hem the bottom of the short's legs. Turn the raw edges under 1/2" and press. Turn under again and press. I did a double row of stitching around the short's legs for a more 'store bought' look.

I'm pretty happy with how these turned out. Free is a good price for maternity clothing!
maternity shorts tutorial

Sunday, April 17, 2011

Refashioning Pants into Maternity Shorts Part I


I seem to have reached a wardrobe crisis. I need summer maternity clothing to wear.

The past few days, I have been obsessively making maternity clothing for myself. I was given a box of maternity things and most are too big and too short for me. So I'm refashioning some of the items into things I can wear this summer.

For example, I attacked these pants:

And turned them into these:
They were several sizes too large (even being 27 weeks pregnant...) so I couldn't just cut them off and add a stretchy waist. What I did was trace a pair of my shorts that do fit and make a pattern. Then I completely dismantled the pants and used the pattern from my own shorts to cut out the new shorts, which is the part of the tutorial I'm going to show today. I'll show the sewing directions tomorrow.

Turn the pants inside out so you can see all the seams. The goal is to rip out the crotch seams and inseam, but not the outseam (if that's a technical term!) By 'outseam', I mean the seam running down the outside of the pant leg.

Rip out the seams at the crotch:

You'll also need to rip out the zipper. (Save it--I have some other projects in mind to try repurposing the zippers I've harvested from several pairs of pants.)

You may also have to remove the waistband binding. It will depend on your pattern and how high up you want the rise of your shorts to go.

Here is my pattern all laid out on the pants. Note that the front and back pieces should be different. The back rise is slightly higher than the front and the crotch portions are different. The goal is to lay out the pattern on top of the pants so that the old 'outseam' is now the pair of short's new outseam. You'll want to lay out the back pattern piece on the back of the pants so you can reuse the pockets and vice versa with the front pattern piece.
When cutting, be sure to add a seam allowance if you didn't add one when making the pattern of your shorts.

After you use the pattern to cut out one set of front and back pieces, lay the cut piece over the remaining pant leg. Use it as the pattern.

Measure the inseam you want your shorts to have, add 2" for hemming, and cut off the bottom part of the pant legs. Save them, I have another project in mind!

Tomorrow, I'll show you how to sew the shorts and add a stretchy waistband. I had too many pictures to show in one post!